Showing posts with label wedding. Show all posts

Thursday, May 29, 2014

Silver 25th Anniversary Cake

A dear friend of mine is throwing her 25th wedding anniversary and asked me to make her a small cake with a cupcake tower. Her theme was the roaring 20s, flappers, feathers and jewels. And everything needed to be colored in silver, black, or white. 
I designed a small cake that would be silver with white flowers and white pearls frappe over every part of the cake. 
Once I knew what my cake would look like it was onto cupcake toppers. I found this really great chocolate mold that has '25' written in the middle of a circular medallion. I gathered up all my supplies a and started working. 


I made 200 little white chocolate discs


I used the Wilton Color Mist in Silver to spray the chocolate toppers and make them appear totally silver


The next step was to make the '25' stand out. I used the black Pearl Dust mixed with a little vodka to create a 'paint' which filled in the little number indents very well.
Though it was EXTREMELY time consuming!!! 
(14hrs total for these toppers start to finish!!!) 


ALMOST DONE!!! Lol! 
The next and last step is the bling :) we have to make these look ornate and like a brooch, so I need to use silver dragees. I added a little edible adhesive glue to the center of each little flower (around the edge) and added a small silver dragee. And as you can see the impact is worth the little extra time. 

 
And here is a close up of the finished product


I am completely in love with these! They're super cute and will even taste yummy! 

Now that those are done its time for me to start working on all the bits and pieces that I will need for my cake. 

The first thing to make are the gum paste flowers. I am only using white since she will be having a silver cake. I made a few roses and some small filler flowers for the topper

 
I also made up some gum paste numbers. '25' for this cake and '15' for a cake I was making the same day. The '15' was done in white gumpaste but later painted with the same black pearl dust as the inside of the '25' on the chocolate toppers, and the '25' was finished with some silver disco dust for a huge impact! 


I made a small little 6in round cake. Frosted it with cream cheese frosting, and piped Corneille lace all over. I then sprayed it with Wilton's Food Spray in Silver. It gave it a wonderful antiqued look. Then I placed the gum paste flowers and the feather topper on top. They looked amazing!!! I also draped some fondant pearls around the top to enhance the "roaring 20s" theme. 


I also frosted and topped all of my cupcakes.
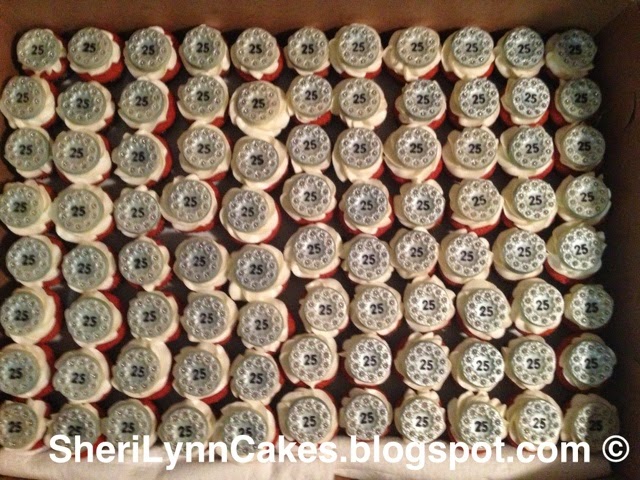

They looked wonderful. I love the little toppers! And they're edible...even better! :) 


Once I arrived at the venue I was able to add the glittery '25' topper...and it looked FABULOUS!!!! Absolutely amazing and perfect for the party! 


And once it was stacked on the top of the cupcake stand it looked even better. I added some feather boas to the edges of the cupcake stand to make it look fancier and to help "carry" the feathers down the stand. 


It looked truly wonderful when finished! One of my favorite projects to date <3 <3 <3 


Monday, March 11, 2013

My First 2 Tier Cake!!!

I was both nervous and excited to make a tiered cake! It is very intimidating! But it really is not as hard as one would think, at least for my tiny 2 tier cake.
Due to the complexity of the work this week (and outside factors/stresses that had nothing to do with the cake) I did not take as many pictures as I would've wanted. I stacked my cakes and began decorating before taking many pics. Sorry!!! I feel horrible, but like I said it was just not my week.

I began by baking two 9inch round cakes, and two 5inch rounds (that I actually cut out of a 13x9 cake pan). I filled them with ganache, crumb coated, and frosted them.
I stacked them by placing 4 cut-off dowels under the area I was stacking my 5in round. After sprinkling a little dehydrated coconut between the layers, and placing the 5inch cake on a foil covered cardboard (I could only find a 6inch board, so I had to make sure my frosting covered up the edges so they didn't show), I placed the smaller cake on top. To help secure the cake I sharpened two dowels and hammered (yes, with an actual hammer!) them all the way through both layers of cake/cardboard. This really helps make sure the cake does not shift in transport.
After they got stacked, we have free reign to do whatever designs we wanted for our class final. One of my favorite design techniques is the Corneille Lace so I had fun and played around with it.
I decided to use a large, dark purple ruffle as a border to help cover the cardboard. And even though it looks kind of blue in the picture it was a awesome royal blue color.


I had a lot of left over flowers from my projects a week or so ago. So I decided to turn this into a Cascading Flower cake! I have been obsessed with them lately and thought this was a good opportunity to learn how to make that work well (with great instruction from my teacher!!!)
I started by figuring out exactly where I wanted the flowers placed. Using a 'S' shape to help them look more natural as the fall down the side, I was able to find flowers that worked and fit onto the cake well. I also placed a big glob of green frosting on the top of the cake and stacked some of my buttercream roses.


After getting the bulk of the flowers on, my teacher helped me make it more natural looking by continuing the flowers onto the border and adding leaves in a few select places.


I think it looks great! The colors are not really what I would use for a wedding cake but this was more inspired by my daughter than a wedding. Maybe it's a classy birthday cake or something. I don't know but this week I was more focused on the techniques used than the styling of the cake. Using my last class as a opportunity to get as much knowledge out of my teacher as possible :)

Thursday, March 7, 2013

Lattice and Lace

This week was our biggest, hardest cake to date but the time and effort payed off because it is also my favorite cake I have ever made!

I started out making two boxed cake mixes (yea, cheating. But since my class is more about decorating I let myself cut this little corner) and that produced 2-9in cakes and a dozen mini-cupcakes. I didn't need the cupcakes, so I frosted them with a light green buttercream and topped them off with a few extra flowers I had made (


I filled my cakes with my favorite ganache (2:1, choc:cream) and stacked them.


Using some thinned down buttercream frosting I created a crumb coat and allowed it to dry.


After it had set up (just at room temperature) I put on my frosting and smoothed it out with my large offset spatula.
 

Thanks to a handy little garland marking tool, I was able to seperate my cake into 8 even areas. I applied a lattice pattern on the sides of the cake, using the marks from the garland tool as a guide for starting and stopping my lines.


I applied the Corneille Lace pattern to the scallops on the top of the cake. (I had never used this technique before but after working on it for a while, it's one of my favorite patterns for a cake. Simple but elegant, and can be made in an size to give it a very different feel)


To help give the illusions of scallops, I made a very small star border around my lattice work (cleaning up all those messy edges I didn't bother cleaning up).


Wanting the top to look a little more elegant, I used a simple, small pearl border around the Corneille Lace.


Final touches to my cake included a larger, yellow shell border around the bottom of the cake (helping to cover up my very messy frosting job) and a few simple (pre-made) wild roses and drop flowers. I chose to make them in purple, because it really popped with the yellow and white frosting.


This is by far my favorite cake I've made. It's simple, elegant, and fun. It would work wonderfully as inspiration for a larger wedding cake, or even a nice birthday party, or a summer picnic.


Friday, February 15, 2013

Hearts & Flowers

Last night, being Valentine's Day, I wanted to bake and make something fun. So, I pulled out all of my leftover frosting from class last week and worked on some different types and shapes of flowers, as well as some heart cuz well...it's Valentine's Day :)


Sunday, February 10, 2013

Buttercream Flowers

Ooohhh! I am so excited to share this with you this week! One of my favorite weeks so far (saying a lot since its only my 3rd cake class ever! Haha!).
I am extremely excited with the many color and size possibilities for these flowers. Can't wait to play with them more!

The first flower I learned was a simple 5 petal flower, which could be used for any flower from a wild rose to a small cherry/apple blossom. Very versatile!


The next flower (one of my personal favorites!) is the sweet pea. A very simple and small flower, which can be piped onto a rose nail or directly on the cake. I love this delicate, small flower. Could be beautiful all over a cake in various colors.


We learned two different methods to make the next flower, a daffodil. Both worked but the second method is my fav! I think it just looks a little more natural, it does require a little more finesse but it's worth it. We also used orange piping gel for the inside detail. I love these! Super cute for a springtime cake!


And now onto our regular roses. We are making our roses on rose sticks, which I originally thought would be harder than the nail but I was super impressed with look of the finished roses. The first rose was a rose I made after switching colors, giving me the ombré effect. The second rose was just my traditional rose. I know they need work! Lol! 


After those we moved onto daisies. I had a harder time with these, but there were two techniques and the second (resulting in a hippy style daisy) was the one that I gravitated towards. It was easy and produced a nice result.


After that we worked on some bachelor buttons, one of my favorite real flowers. They turned out well, but I think I would've liked them better if I had colored them more accurately.


Our final flowers were the VERY basic drop flowers. Pretty simple buy used often in cake decorating.