Showing posts with label purple. Show all posts

Tuesday, April 14, 2015

Purple Penguin Cake

I had a request for a penguin cake...and well, not being very good at carving cakes, I had to find a simple way to achieve that. This idea was simple but ADORABLE! 
Two small 6in round cakes. I cut the top off the bottom cake, but did not cut the top off the second cake. I was so lucky that the cake on top actually raised into a perfect little dome (otherwise I would've had to carve it out a little bit). 
Since the customer's favorite color was purple, we decided to go with a purple penguin. 


I made a tiny little pink bow for the top of her head (to add to the adorable factor, lol!) 


Little button eyes, thin purple fondant for wings, and yellow fondant feet and beak.....ADORABLE!!! HAHA! :)  


Probably one of my very favorite cakes! It's so super adorable and just got cuter the longer you looked at it. I loved it!!!


Wednesday, May 15, 2013

Purple Topsy Turvy Rose Cake


Time to make a fun crooked or topsy turvy cake! It's my last week in class so I wanted to make it really fun and challenging. 
I had to make all of my decorations the week before so they would have enough time to dry when I put them on the cake.

I made a bunch of small gum paste pearls and threw them in a plastic bag with a tiny pinch of gold luster dust. After rolling them around for a second they were all covered and ready to go. 


I also made some larger gum paste pearls, but covered those with just a white pearl color. They looked wonderfully shiny when they got done. 


I knew I was going to use the pearls as a border on the largest bottom tier, so it was time to figure out what I wanted my second tier to look like. To help keep the look clean and elegant I ended up picking a bow and ribbon to finish off the top tier.
I had to make a bow (simply rolling out my gum paste, cutting long ribbons, and folding them over a paper towel round)


And of course the ribbon ends that fall nicely over the edges. 


I decided to make a pretty brooch for the inside of the bow instead of just finishing it off with a gum paste ribbon. 
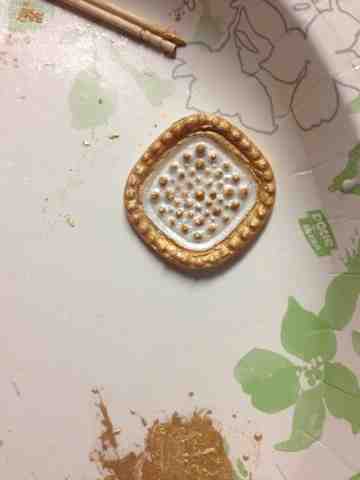
I used a Wilton jewel mold to make this pretty little brooch. It worked really well! 


Once it dried a little bit, I brushed it with some pearl luster dust. Because a brooch can't be matte! It must be shiny! Lol! :)


Then I took some gold luster dust(+vodka) and painted a few of the details, helping them pop. I love how it turned out!!! 


I also had some gum paste roses I had made a few days earlier (see previous post for tutorial/more pictures).


After dusting the roses with a little pearl and gold luster dust, I packed everything up so it didn't get broken before my class this week. 


I baked a variety of flavors this week, because a crooked cake shouldn't take itself too seriously, it's a fun cake! :) 
So the top (6in) tier is chocolate/vanilla/chocolate. And the bottom tier is key lime/vanilla/orange. With a standard buttercream as filling for both.
I started with a 6in and 9in cake, placed on a 5in and 8in cardboard. I turned them upside down and carved a slight slant into the sides of the cake so the base of each tier was fit onto the smaller cardboard. 


I used a 6in cardboard to carve a hole in the top of my bottom cake, as well as carving a slight slant into the top of both tiers.


I covered both tiers with a dark purple fondant and stacked them so that the slants on the tops went different directions. 
I also added the premade pearls to the bottom tier (alternating colors/sizes). 


To finish the cake off, I placed the gum paste bow between the two tiers with a little buttercream icing, and made a quick gum paste ribbon to drape around the entire thing. 
I also added the gum paste roses to the top, and decorated it with a few more leaves to help complete the look. 


It turned out so fabulously!!! 


Absolutely the best cake I have made so far! I love it! Love it! Love it!
Fun, funky, elegant, PERFECTION!!!! :) 


Sunday, April 14, 2013

Pink Lemonade Petit Fours

I was so excited for class this week!!! I have been waiting for this class since day one. I LOVE petit fours! They are some of my favorite desserts because they are easy, simple, elegant, and can come in so many varieties/styles/designs. I could not wait to learn how to make them properly :)


I started with a 9x13 Pink Lemonade cake, cut into 2x2in squares. I chose not to fill them this time because I did not have enough time this week (2 kids home sick from school all week did not give me a lot of spare time).


I also crumbed coated the 2x2in squares with pink buttercream and colored the poured fondant pink as well, to cover the Pink Lemonade cakes color.


I used a (clean!) hair pick to hold the cakes while I poured some fondant over the top, making sure to cover all corners properly and not to have it too thick on the top/sides.


After I made sure the excess was off, I placed it on a cake cooling rack (over a piece of wax paper, to catch the drips) and let them set up just a little bit.


Before they set up completely I placed the decorations on top. I had some leftover glittery blossom flowers, so I put them on top of a few petit fours.


Putting them in cute little petit four wrappers, available at your local bakery or craft store, really helped jazz them up and make them look much more professional and complete looking.


I put them all together in a 1/4 sheet box. There were quite a few with flowers on them.


But I also did a few with scroll like decorations, as well as some ruffles and flower/scroll/dot buttercream decorations. Just trying out a few different things to see how they worked out.


Then ended up looking wonderful though! I really loved them. cant wait to make another batch!


They were a big hit with everyone I shared them with! :)

Tuesday, April 9, 2013

Doll Dress Cake #2 w/Flower Cupcakes

My project this weekend was a birthday cake for my daughters friend's party. She was turning 7 and loved Princesses and her favorite color is Purple :) so this cake was a total winner for her! She was SO SO excited to see her finished cake!
I started by practicing with my new frosting tip (#070-a handy little ruffle tip that actually looks a lot like fabric!). I went around the outside of the pan to get a feel for it, and it actually worked out pretty well.

I also made some flowers to place on top of the cupcakes that will be going with this cake. I used pink and two shades of purple to make some simple drop flowers. And finished them off with edible glitter to make them shimmer.

The flowers ended up onto of the cupcakes for the party. They turned out AMAZING!!! I loved them SO SO SO much! They were simple vanilla with whip kreme buttercream but everyone was in love with them.


Now it was time to decorate the cake. She wanted the dress to be pink and purple so we started with a pink crumb coat (purple frosting filling inside the cake) and added extra pink frosting on the front so that the front of her skirt could be a pink Corneille lace pattern. Because she loves princesses, I made sure to add a lot of glitter on the front/pink part of the skirt.


I then added layer after layer of ruffles (the pics look kind of blue but it was just a dark plum purple) until we finished the bottom of the dress, as well as adding a simple beaded border to the bottom and front of the dress to help finish off the edges. I also added one of the light purple glittery flowers(and two small white ones) to the front of the dress to help finish it off.


I was really happy with it, so of course something had to happen! Haha! Well, my cake cooling rack fell over and smashed into the side of my cake ripping off 4 layers of ruffles (which cannot be added in easily). To avoid disaster I was able to add a bunch more layers of ruffles, but it was a rather tricky fix.
Then on the way there, the extra ruffles were too heavy and the back/top ruffle started to rip and tear but that's alright...it's in the back! Hahaha! That's what I kept telling myself to stay calm and not freak out on my husband while we were driving! Lol!
Despite everything...It ended up looking wonderful! The birthday girl (and everyone else) loved it!!! :) I had a ton of fun making this cake and was so happy with how the cupcakes turned out! Everyone was happy and went back for seconds, so I would say this project was a success.

Wednesday, March 13, 2013

Mini-Cakes with the Kids

After making my two tiered cake in class, my kids wanted to make their own. I used some leftover cake I saved from cutting my two 5inch rounds (see previous blog post) and cut out some squares to stack and make mini cakes.


I made a mistake and stacked them before I crumb coated and frosted them, making it way harder on myself than really needed.


My daughter wanted purple and my son wanted green. They ended up looking a little like The Hulk colors. Haha! Love it though.


My daughter really loved the Corneille Lace so we covered the bottom tier of her cake with that and added a pearl border around both tiers. We also used some leftover buttercream decorations (hearts and an ombré rose) to finish off her cake.


My son, on the other hand, wanted to make a cake that's very non-traditional so we went with a alien/octopus hybrid thing. Haha! It's pretty fabulous. Especially since he was able to pipe most of his decorations himself.


A very fun night of decorating and eating tons of cake and frosting 😃

Monday, March 11, 2013

My First 2 Tier Cake!!!

I was both nervous and excited to make a tiered cake! It is very intimidating! But it really is not as hard as one would think, at least for my tiny 2 tier cake.
Due to the complexity of the work this week (and outside factors/stresses that had nothing to do with the cake) I did not take as many pictures as I would've wanted. I stacked my cakes and began decorating before taking many pics. Sorry!!! I feel horrible, but like I said it was just not my week.

I began by baking two 9inch round cakes, and two 5inch rounds (that I actually cut out of a 13x9 cake pan). I filled them with ganache, crumb coated, and frosted them.
I stacked them by placing 4 cut-off dowels under the area I was stacking my 5in round. After sprinkling a little dehydrated coconut between the layers, and placing the 5inch cake on a foil covered cardboard (I could only find a 6inch board, so I had to make sure my frosting covered up the edges so they didn't show), I placed the smaller cake on top. To help secure the cake I sharpened two dowels and hammered (yes, with an actual hammer!) them all the way through both layers of cake/cardboard. This really helps make sure the cake does not shift in transport.
After they got stacked, we have free reign to do whatever designs we wanted for our class final. One of my favorite design techniques is the Corneille Lace so I had fun and played around with it.
I decided to use a large, dark purple ruffle as a border to help cover the cardboard. And even though it looks kind of blue in the picture it was a awesome royal blue color.


I had a lot of left over flowers from my projects a week or so ago. So I decided to turn this into a Cascading Flower cake! I have been obsessed with them lately and thought this was a good opportunity to learn how to make that work well (with great instruction from my teacher!!!)
I started by figuring out exactly where I wanted the flowers placed. Using a 'S' shape to help them look more natural as the fall down the side, I was able to find flowers that worked and fit onto the cake well. I also placed a big glob of green frosting on the top of the cake and stacked some of my buttercream roses.


After getting the bulk of the flowers on, my teacher helped me make it more natural looking by continuing the flowers onto the border and adding leaves in a few select places.


I think it looks great! The colors are not really what I would use for a wedding cake but this was more inspired by my daughter than a wedding. Maybe it's a classy birthday cake or something. I don't know but this week I was more focused on the techniques used than the styling of the cake. Using my last class as a opportunity to get as much knowledge out of my teacher as possible :)