Showing posts with label pearls. Show all posts

Tuesday, June 10, 2014

Rose Bridal Shower Cake

Summer has begun! Hooray for flip-flops, farmers markets, fresh berry lemonaid, and...the beginning of wedding season! :)
My first "summer" project was a simple/small bridal shower cake. I received a call the night before it was needed and was asked to make something "girly and fun" for a friends' surprise bridal shower.
I quickly baked up a simple 6in vanilla cake with a creme bokay frosting. 
I decided to tint the frosting a soft pink and do a simple rosette cake. I began piping buttercream roses along the side in two rows. There were small areas where the cake was showing through, so  I piped a little star shaped flower in the holes and added 3 pearls to the center of those star flowers. 

    (Ignore my ugly background. Lol!)

After the sides were completed I moved into the top. I didn't have enough frosting to make a bunch of little rosettes on the top so I made one large rose that covered the entire top of the cake. 
When I finished the rose on top I added marshmallow fondant pearls as a border to the top....


...as well as the bottom. 


I absolutely LOVE this cake!!! It was simple and since I didn't spend too much time planning it I didn't over think it and it was wonderful in its simplicity! 


Such a perfect little bridal shower cake! I love this so much! Can't wait to experiment with this rosette technique on other cakes/projects. The visual impact is really stunning! 

Thursday, May 29, 2014

15th Anniversary Cake

This was a simple cake that I put together quickly for a 15th anniversary. I used cream cheese frosting as a base and added fondant details to the top of that. I used simple stripes and pearls, but added a '15' to the top. 


It turned out well for a last minute cake :) simple but elegant

Silver 25th Anniversary Cake

A dear friend of mine is throwing her 25th wedding anniversary and asked me to make her a small cake with a cupcake tower. Her theme was the roaring 20s, flappers, feathers and jewels. And everything needed to be colored in silver, black, or white. 
I designed a small cake that would be silver with white flowers and white pearls frappe over every part of the cake. 
Once I knew what my cake would look like it was onto cupcake toppers. I found this really great chocolate mold that has '25' written in the middle of a circular medallion. I gathered up all my supplies a and started working. 


I made 200 little white chocolate discs


I used the Wilton Color Mist in Silver to spray the chocolate toppers and make them appear totally silver


The next step was to make the '25' stand out. I used the black Pearl Dust mixed with a little vodka to create a 'paint' which filled in the little number indents very well.
Though it was EXTREMELY time consuming!!! 
(14hrs total for these toppers start to finish!!!) 


ALMOST DONE!!! Lol! 
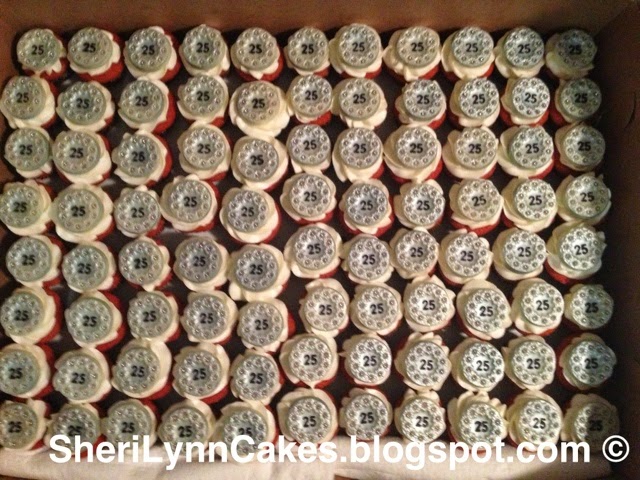
The next and last step is the bling :) we have to make these look ornate and like a brooch, so I need to use silver dragees. I added a little edible adhesive glue to the center of each little flower (around the edge) and added a small silver dragee. And as you can see the impact is worth the little extra time. 

 
And here is a close up of the finished product


I am completely in love with these! They're super cute and will even taste yummy! 

Now that those are done its time for me to start working on all the bits and pieces that I will need for my cake. 

The first thing to make are the gum paste flowers. I am only using white since she will be having a silver cake. I made a few roses and some small filler flowers for the topper

 
I also made up some gum paste numbers. '25' for this cake and '15' for a cake I was making the same day. The '15' was done in white gumpaste but later painted with the same black pearl dust as the inside of the '25' on the chocolate toppers, and the '25' was finished with some silver disco dust for a huge impact! 


I made a small little 6in round cake. Frosted it with cream cheese frosting, and piped Corneille lace all over. I then sprayed it with Wilton's Food Spray in Silver. It gave it a wonderful antiqued look. Then I placed the gum paste flowers and the feather topper on top. They looked amazing!!! I also draped some fondant pearls around the top to enhance the "roaring 20s" theme. 


I also frosted and topped all of my cupcakes.


They looked wonderful. I love the little toppers! And they're edible...even better! :) 


Once I arrived at the venue I was able to add the glittery '25' topper...and it looked FABULOUS!!!! Absolutely amazing and perfect for the party! 


And once it was stacked on the top of the cupcake stand it looked even better. I added some feather boas to the edges of the cupcake stand to make it look fancier and to help "carry" the feathers down the stand. 


It looked truly wonderful when finished! One of my favorite projects to date <3 <3 <3 


Sunday, November 24, 2013

Pink Princess Cake with Shooting Stars

This weeks cake was inspired by one my friend had seen and described to me. 
It's a very glittery pink princess cake! Yay! :) 
I started by making all the fun little details that would make this cake special.
Using gum paste (with very little 'Deep Pink' coloring) I made numerous pink daisies. I let them dry in small plastic spoons to give them a nice curve in the middle, as well as a few petals moving different directions to give them.a more natural look.


When they were dry, I dusted them with pearl dust and added a small gumpaste flower center (which was also dusted with pearl dust) 


Using the same pink gum paste, I made a pink bow for the front of the cake. 
Placing rolled-up paper towels into the centers of the bow loops helps it stay in shape and not collapse on itself while it's drying. 
After it was dry, I dusted it with hot pink disco dust. Absolutely Fabulous! Haha! :)


Because this cake was a 2nd b-day cake, and would be eaten by many toddlers, I decided to use lollipop sticks instead of wire to hold up my stars. I used white gum paste and cut out stars, placed one on each side of the stick and 'glued' them together with water. Then once they dried I dusted them with white pearl dust to give them a nice shimmery star look. 
 

Besides the pearls, name banner and letters, I was ready for the cake assembling to start. 

I baked a vanilla bean cake with real Madagascar Vanilla Beans (yummmm!!!) 


Banana cream filling (with a pink frosting barrier)


After everything was stacked and frosted it was time to start putting everything together. 
I used fondant to make the banner, letters, and pearls (dusting them all with white pearl dust). I added pearls to the top, bottom, and the places where the piping touches in the middle. I stuck all the flowers down with a little extra buttercream, and dusted the whole cake with the disco dust so it shimmered. 
I also added a silver and pink tiara, as well as a little wand on the front next to the bow. 


And to finish it off....the stars!!! I added 5 stars, all a little off center from each other.


I absolutely love how this cake came out!!! Super cute and girly! <3 always thankful for all these different, fun cake projects!

Wednesday, May 15, 2013

Purple Topsy Turvy Rose Cake


Time to make a fun crooked or topsy turvy cake! It's my last week in class so I wanted to make it really fun and challenging. 
I had to make all of my decorations the week before so they would have enough time to dry when I put them on the cake.

I made a bunch of small gum paste pearls and threw them in a plastic bag with a tiny pinch of gold luster dust. After rolling them around for a second they were all covered and ready to go. 


I also made some larger gum paste pearls, but covered those with just a white pearl color. They looked wonderfully shiny when they got done. 


I knew I was going to use the pearls as a border on the largest bottom tier, so it was time to figure out what I wanted my second tier to look like. To help keep the look clean and elegant I ended up picking a bow and ribbon to finish off the top tier.
I had to make a bow (simply rolling out my gum paste, cutting long ribbons, and folding them over a paper towel round)


And of course the ribbon ends that fall nicely over the edges. 


I decided to make a pretty brooch for the inside of the bow instead of just finishing it off with a gum paste ribbon. 
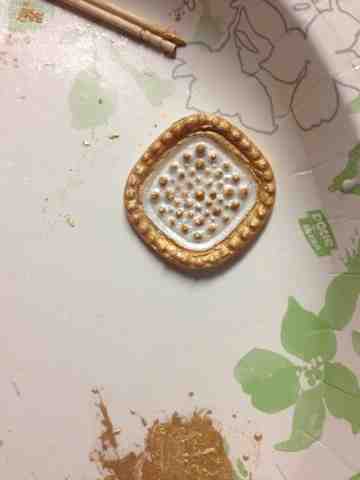
I used a Wilton jewel mold to make this pretty little brooch. It worked really well! 


Once it dried a little bit, I brushed it with some pearl luster dust. Because a brooch can't be matte! It must be shiny! Lol! :)


Then I took some gold luster dust(+vodka) and painted a few of the details, helping them pop. I love how it turned out!!! 


I also had some gum paste roses I had made a few days earlier (see previous post for tutorial/more pictures).


After dusting the roses with a little pearl and gold luster dust, I packed everything up so it didn't get broken before my class this week. 


I baked a variety of flavors this week, because a crooked cake shouldn't take itself too seriously, it's a fun cake! :) 
So the top (6in) tier is chocolate/vanilla/chocolate. And the bottom tier is key lime/vanilla/orange. With a standard buttercream as filling for both.
I started with a 6in and 9in cake, placed on a 5in and 8in cardboard. I turned them upside down and carved a slight slant into the sides of the cake so the base of each tier was fit onto the smaller cardboard. 


I used a 6in cardboard to carve a hole in the top of my bottom cake, as well as carving a slight slant into the top of both tiers.


I covered both tiers with a dark purple fondant and stacked them so that the slants on the tops went different directions. 
I also added the premade pearls to the bottom tier (alternating colors/sizes). 


To finish the cake off, I placed the gum paste bow between the two tiers with a little buttercream icing, and made a quick gum paste ribbon to drape around the entire thing. 
I also added the gum paste roses to the top, and decorated it with a few more leaves to help complete the look. 


It turned out so fabulously!!! 


Absolutely the best cake I have made so far! I love it! Love it! Love it!
Fun, funky, elegant, PERFECTION!!!! :)