Showing posts with label crown. Show all posts

Sunday, November 24, 2013

Pink Princess Cake with Shooting Stars

This weeks cake was inspired by one my friend had seen and described to me. 
It's a very glittery pink princess cake! Yay! :) 
I started by making all the fun little details that would make this cake special.
Using gum paste (with very little 'Deep Pink' coloring) I made numerous pink daisies. I let them dry in small plastic spoons to give them a nice curve in the middle, as well as a few petals moving different directions to give them.a more natural look.


When they were dry, I dusted them with pearl dust and added a small gumpaste flower center (which was also dusted with pearl dust) 


Using the same pink gum paste, I made a pink bow for the front of the cake. 
Placing rolled-up paper towels into the centers of the bow loops helps it stay in shape and not collapse on itself while it's drying. 
After it was dry, I dusted it with hot pink disco dust. Absolutely Fabulous! Haha! :)


Because this cake was a 2nd b-day cake, and would be eaten by many toddlers, I decided to use lollipop sticks instead of wire to hold up my stars. I used white gum paste and cut out stars, placed one on each side of the stick and 'glued' them together with water. Then once they dried I dusted them with white pearl dust to give them a nice shimmery star look. 
 

Besides the pearls, name banner and letters, I was ready for the cake assembling to start. 

I baked a vanilla bean cake with real Madagascar Vanilla Beans (yummmm!!!) 


Banana cream filling (with a pink frosting barrier)


After everything was stacked and frosted it was time to start putting everything together. 
I used fondant to make the banner, letters, and pearls (dusting them all with white pearl dust). I added pearls to the top, bottom, and the places where the piping touches in the middle. I stuck all the flowers down with a little extra buttercream, and dusted the whole cake with the disco dust so it shimmered. 
I also added a silver and pink tiara, as well as a little wand on the front next to the bow. 


And to finish it off....the stars!!! I added 5 stars, all a little off center from each other.


I absolutely love how this cake came out!!! Super cute and girly! <3 always thankful for all these different, fun cake projects!

Tuesday, April 9, 2013

Advanced Borders & Ruffles

I am so glad to be back in class! Yay! Spring break is great and everything but a whole month off of classes was boring. Haha!
This class was a simple Intro to Level 2 class, with a little work on embellishing borders and color techniques (and I asked my teacher about a few different ruffle tips, so we got a little tutorial on that too).

The first thing we worked on was a rope border(tip#14). She showed us two different ways to achieve this look. It took me a while to get it down but you can see that it starts to get a little better at the end

.

This picture shows the many different ways to achieve a similar 'rope' look. One of which was an 'E' motion border(tip#14). It is a very versatile border technique. Spacing it out will give you a look that's more similar to rosettes while getting it in tight together would give you more of a rope look.


We then worked on the 'C' motion border(tip#14). This is a less versatile border/decoration technique but would really come in handy for a beach/pirate/mermaid/water themed cake.

Rosettes(tip#14) were next. They are a simple a wonderful decoration that adds to the cake/cupcake quickly and easily.


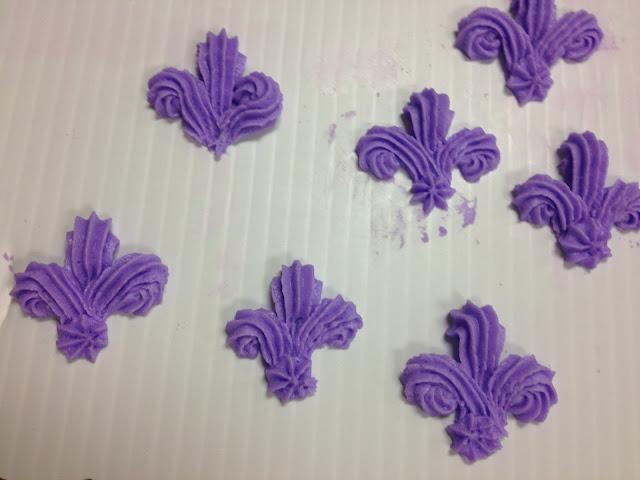
Another fun decoration that adds a lot to a simple cake is the buttercream Fleur-de-Lis(tip#14). It isn't extremely speculator by itself but adding some small dots or extra embellishments to this in a simple pattern adds a lot of visual interest to cakes.

The same thing could be said about the next border we worked on, the crown border(tip#14). It's not very stunning by itself but adding broaches, sprinkles, flowers, or even more buttercream decorations around the border really do create something spectacular.

We worked on two different types of swags next. These will come in handy to accent round cakes, doll dress cakes, or other fancy fabric style cakes.
The first fabric swag(tip#104) looks more like fabric to me and reminds me of a princess dress or something. I really like this one.

The next style we worked on was a ruffle zigzag swag(tip#14). This style seems a little less versatile than the other one but it really does look pretty. Haven't figured out how to use this one yet but I am sure I will find a need for this soon.

We then worked on a technique that uses the petal for a 5-petal drop flower as a border(tip#104), or even potentially to fill a cake giving the illusion similar to ruffles. (THE PICTURE USED IS ONE TAKEN AFTER I HAD PLACED TWO COLORS OF ICING IN THE BAG) This technique really reminds me of fish or mermaid scales. I think it could be very pretty in an ombré style around the entire cake.

I also worked on a simple reverse shell pattern. While it's simple, the visual impact is great. I really liked this border.


The next technique we worked on was simple vine and scroll work(tip#14). Very gorgeous on the side of the cake!!!


To help emphasize a border we learned how to properly embellish a simple shell border to look like the border below. By stacking different borders on top of each other or next to each other you can achieve a very intricate detail for your cake.


Another thing we worked on this week was color striping and color stripping. We took two separate bags and painted food coloring inside one of the bags to give the stripped look to the white buttercream.


The second bag was used to fill a bag with purple AND white (in pastry bags, placed inside of one plastic bag) to give a wonderful color block illusion.

Using a new tip(#070) and the bag with the color striping, I was able to achieve a very cool fabric ruffle design. I loved it!!!