Showing posts with label buttercream. Show all posts

Friday, August 15, 2014

White Wedding Cake with Royal Blue Ribbon

This week I had the wonderful privilege of making my life long friend's wedding cake <3
She was having a 4th of July, beach wedding. She had picked a very simple color palette, of just navy and white, and explained the the overall theme/style as "simple" as well. So I didn't want a lot of embellishments, details, etc on the cake (which I found surprisingly hard to  edit myself for this one, I wanted to add shimmer/glitter, flowers...then more flowers, edible diamonds, etc)
I went with this very basic/rustic white butter cream cake, with two layers of a strawberry orange cake and one layer of chocolate (6in, 8in, 10in). I added a simple fondant ribbon along the bottom - in the same color as the ribbon on her wedding dress. And finished it with a little butter cream pearl border.  


Once it was all set up and ready to go I added the finishing touch - a custom made wedding topper to celebrate the new couple <3


We were very happy that it did not melt and made it to the beach in one piece (with the 3hr drive and 80deg temperatures). I feel so honored to have be part of such a special day! <3

Tuesday, April 9, 2013

Advanced Borders & Ruffles

I am so glad to be back in class! Yay! Spring break is great and everything but a whole month off of classes was boring. Haha!
This class was a simple Intro to Level 2 class, with a little work on embellishing borders and color techniques (and I asked my teacher about a few different ruffle tips, so we got a little tutorial on that too).

The first thing we worked on was a rope border(tip#14). She showed us two different ways to achieve this look. It took me a while to get it down but you can see that it starts to get a little better at the end

.

This picture shows the many different ways to achieve a similar 'rope' look. One of which was an 'E' motion border(tip#14). It is a very versatile border technique. Spacing it out will give you a look that's more similar to rosettes while getting it in tight together would give you more of a rope look.


We then worked on the 'C' motion border(tip#14). This is a less versatile border/decoration technique but would really come in handy for a beach/pirate/mermaid/water themed cake.

Rosettes(tip#14) were next. They are a simple a wonderful decoration that adds to the cake/cupcake quickly and easily.


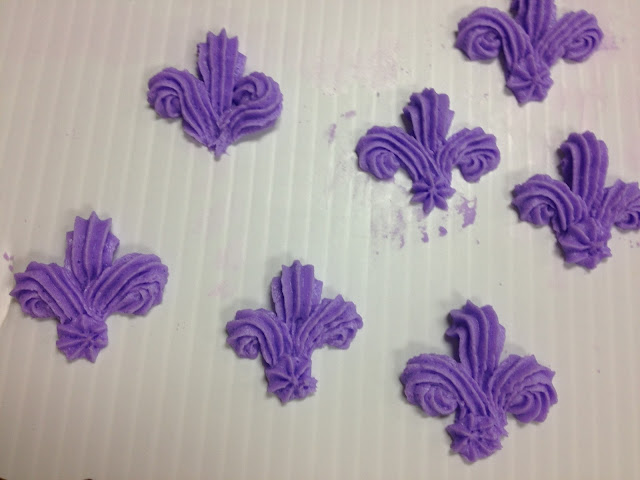
Another fun decoration that adds a lot to a simple cake is the buttercream Fleur-de-Lis(tip#14). It isn't extremely speculator by itself but adding some small dots or extra embellishments to this in a simple pattern adds a lot of visual interest to cakes.
The same thing could be said about the next border we worked on, the crown border(tip#14). It's not very stunning by itself but adding broaches, sprinkles, flowers, or even more buttercream decorations around the border really do create something spectacular.

We worked on two different types of swags next. These will come in handy to accent round cakes, doll dress cakes, or other fancy fabric style cakes.
The first fabric swag(tip#104) looks more like fabric to me and reminds me of a princess dress or something. I really like this one.

The next style we worked on was a ruffle zigzag swag(tip#14). This style seems a little less versatile than the other one but it really does look pretty. Haven't figured out how to use this one yet but I am sure I will find a need for this soon.

We then worked on a technique that uses the petal for a 5-petal drop flower as a border(tip#104), or even potentially to fill a cake giving the illusion similar to ruffles. (THE PICTURE USED IS ONE TAKEN AFTER I HAD PLACED TWO COLORS OF ICING IN THE BAG) This technique really reminds me of fish or mermaid scales. I think it could be very pretty in an ombré style around the entire cake.

I also worked on a simple reverse shell pattern. While it's simple, the visual impact is great. I really liked this border.


The next technique we worked on was simple vine and scroll work(tip#14). Very gorgeous on the side of the cake!!!


To help emphasize a border we learned how to properly embellish a simple shell border to look like the border below. By stacking different borders on top of each other or next to each other you can achieve a very intricate detail for your cake.


Another thing we worked on this week was color striping and color stripping. We took two separate bags and painted food coloring inside one of the bags to give the stripped look to the white buttercream.


The second bag was used to fill a bag with purple AND white (in pastry bags, placed inside of one plastic bag) to give a wonderful color block illusion.

Using a new tip(#070) and the bag with the color striping, I was able to achieve a very cool fabric ruffle design. I loved it!!!


Saturday, March 16, 2013

Saturday Practice

I was bored this Saturday so I whipped up a batch of buttercream and practiced a few techniques.
I decided to make my frosting orange today because it seemed fun. And is not a color I use very often so this seemed like a good chance.
I started by working on my basket weave technique. This is hard to master. Plotting out the proper spacing is the most important part to help ensure that you have a nice tight basket weave. I used a small round tip (tip #4 I think) for the white and a small star tip (#16) for the orange to achieve this look. No basket weave tip for me. Lol! I like the hard way. It looks amazing in my opinion and tends to take more time and effort but it really does look great.
I also used the star tip to create the rope border around my basket weave design.


The next technique I was wanting to learn was how to pipe a buttercream bow. I use tip #104 and a rose nail to make these. I didn't get a lot of pics because these were hard! And didn't always turn out very well. I made the two loops of the bow by placing the wide side of the tip on the nail and moving it around until one side is made, turning it and making the other side. Then making the ruffled ends coming down from the center of the bow. I love these bows! I just need to master them and they will be able to be used in so many ways!


After I was done with that, I decided to whip out a few 5-petal flowers. I used tip #104 for the flower petals and tip #16 for the center. I really like these actually...they remind me of creamsicles or something. I think they're cute. Just need to find a use for them.


Not a bad way to spend a Saturday...😊

Thursday, March 7, 2013

Lattice and Lace

This week was our biggest, hardest cake to date but the time and effort payed off because it is also my favorite cake I have ever made!

I started out making two boxed cake mixes (yea, cheating. But since my class is more about decorating I let myself cut this little corner) and that produced 2-9in cakes and a dozen mini-cupcakes. I didn't need the cupcakes, so I frosted them with a light green buttercream and topped them off with a few extra flowers I had made (


I filled my cakes with my favorite ganache (2:1, choc:cream) and stacked them.


Using some thinned down buttercream frosting I created a crumb coat and allowed it to dry.


After it had set up (just at room temperature) I put on my frosting and smoothed it out with my large offset spatula.
 

Thanks to a handy little garland marking tool, I was able to seperate my cake into 8 even areas. I applied a lattice pattern on the sides of the cake, using the marks from the garland tool as a guide for starting and stopping my lines.


I applied the Corneille Lace pattern to the scallops on the top of the cake. (I had never used this technique before but after working on it for a while, it's one of my favorite patterns for a cake. Simple but elegant, and can be made in an size to give it a very different feel)


To help give the illusions of scallops, I made a very small star border around my lattice work (cleaning up all those messy edges I didn't bother cleaning up).


Wanting the top to look a little more elegant, I used a simple, small pearl border around the Corneille Lace.


Final touches to my cake included a larger, yellow shell border around the bottom of the cake (helping to cover up my very messy frosting job) and a few simple (pre-made) wild roses and drop flowers. I chose to make them in purple, because it really popped with the yellow and white frosting.


This is by far my favorite cake I've made. It's simple, elegant, and fun. It would work wonderfully as inspiration for a larger wedding cake, or even a nice birthday party, or a summer picnic.


Monday, February 18, 2013

Mini-Cupcakes!!!

Who doesn't love mini-cupcakes! They're a perfect little bite sized treat. I had some extra batter left over from the cakes I baked for class tomorrow (pictures of that cake will be up soon), so I decided to make mini-cupcakes. It actually worked out to make exactly 2 dozen.


I decorated them with green buttercream frosting and added the extra buttercream flowers I would not be using next week. I love the look of the mini-cupcakes with the larger flowers too!
So cute!!!


Friday, February 15, 2013

Gluten-free, Sugar-free Chocolate cupcakes

In an attempt to make a yummy treat for my in-laws I discovered a new gluten and sugar free cupcake recipe. They taste okay, not great but just okay. Absolutely need to perfect my recipe but for a first attempt they are pretty great. I also got to use the hearts and flowers I made last night.

The flourless dough:


Baked cupcakes actually looked better than I expected:


I whipped up some SugarFree vanilla buttercream to go ontop:
 
I topped the cupcakes with the buttercream and added the toppers I had made a few nights before (http://sherilynncakes.blogspot.com/2013/02/hearts-flowers.html) 


For Sugar Free and Gluten Free cupcakes...they look pretty cute! Haha! :) 


Hearts & Flowers

Last night, being Valentine's Day, I wanted to bake and make something fun. So, I pulled out all of my leftover frosting from class last week and worked on some different types and shapes of flowers, as well as some heart cuz well...it's Valentine's Day :)