Showing posts with label birthday cake. Show all posts

Tuesday, April 14, 2015

Flowery Hello Kitty Cake


Fondant flowers are one of my very favorite things to make. I made them in various shades of purple, pink, and some yellow ones. I used white pearl and silver dragees of different sizes for the centers of the flowers. 


I also made up some larger flowers with a bunch of different colors and sizes. 


I used a vanilla confetti cake recipe to make 2 - 10 in rounds. 


And used royal icing to make a little Hello Kitty to put on the top of the cake.


I used a soft fluffy, pink buttercream to cover the cake. Added white fondant pearls to the bottom of the cake and added all of my flowers onto the sides and top of the cake.


I added the "Happy Birthday" message and the Hello Kitty image to the top. I also added a little fondant flower to the image to help it pop. 


It turned out really well and was very girly and fun! Sweet little Sophia loved it and had a wonderful 2nd birthday!!!


Saturday, July 6, 2013

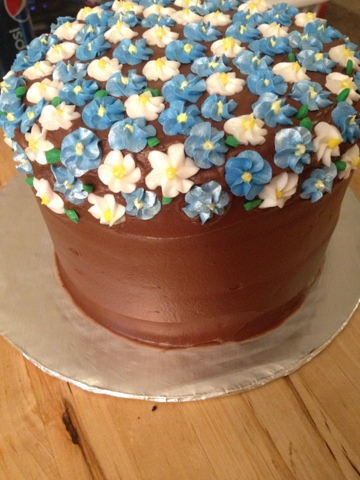
Drop Flower Chocolate Cake

My mother in laws birthday was yesterday, so I decided to whip her up a quick cake. She is on a gluten-free diet and (thanks to Betty Crocker) I was able to make her one!
I know she loves chocolate, so I made a devils food cake, with PB/chocolate filling and chocolate frosting. I used a 6in pan, and did three layers to achieve the height that I wanted. 


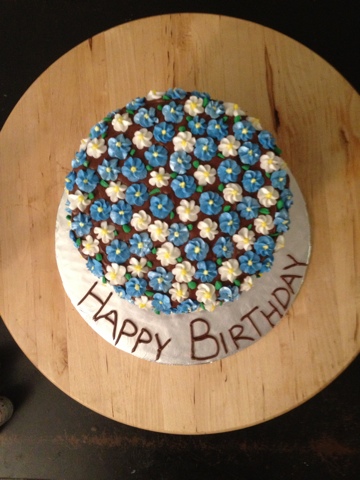
Those kind of cakes, though absolutely delicious, are not always the prettiest. So, to make it a little more special I started to added some royal icing drop flowers (that had been sprayed with a pearl glitter spray)....


...lots of them! Allowing them to cascade over the sides.

 I also added some green leaves...


....a chocolate pearl border...


...and a happy birthday message on the cardboard.


It was absolutely delicious! I was super impressed with the Betty Crocker gluten-free cake mix! It's awesome! Yay for finally allowing many people to make yummy cakes at home again! Love them for that!!! 

I was really happy with the end result (and so was my MIL)! It looked gorgeous and tasted even better. And didn't take me any time at all! Gotta love the easy, show stopping cakes! :) 


Tuesday, April 9, 2013

Doll Dress Cake #2 w/Flower Cupcakes

My project this weekend was a birthday cake for my daughters friend's party. She was turning 7 and loved Princesses and her favorite color is Purple :) so this cake was a total winner for her! She was SO SO excited to see her finished cake!
I started by practicing with my new frosting tip (#070-a handy little ruffle tip that actually looks a lot like fabric!). I went around the outside of the pan to get a feel for it, and it actually worked out pretty well.

I also made some flowers to place on top of the cupcakes that will be going with this cake. I used pink and two shades of purple to make some simple drop flowers. And finished them off with edible glitter to make them shimmer.

The flowers ended up onto of the cupcakes for the party. They turned out AMAZING!!! I loved them SO SO SO much! They were simple vanilla with whip kreme buttercream but everyone was in love with them.


Now it was time to decorate the cake. She wanted the dress to be pink and purple so we started with a pink crumb coat (purple frosting filling inside the cake) and added extra pink frosting on the front so that the front of her skirt could be a pink Corneille lace pattern. Because she loves princesses, I made sure to add a lot of glitter on the front/pink part of the skirt.


I then added layer after layer of ruffles (the pics look kind of blue but it was just a dark plum purple) until we finished the bottom of the dress, as well as adding a simple beaded border to the bottom and front of the dress to help finish off the edges. I also added one of the light purple glittery flowers(and two small white ones) to the front of the dress to help finish it off.


I was really happy with it, so of course something had to happen! Haha! Well, my cake cooling rack fell over and smashed into the side of my cake ripping off 4 layers of ruffles (which cannot be added in easily). To avoid disaster I was able to add a bunch more layers of ruffles, but it was a rather tricky fix.
Then on the way there, the extra ruffles were too heavy and the back/top ruffle started to rip and tear but that's alright...it's in the back! Hahaha! That's what I kept telling myself to stay calm and not freak out on my husband while we were driving! Lol!
Despite everything...It ended up looking wonderful! The birthday girl (and everyone else) loved it!!! :) I had a ton of fun making this cake and was so happy with how the cupcakes turned out! Everyone was happy and went back for seconds, so I would say this project was a success.

Thursday, March 7, 2013

Lattice and Lace

This week was our biggest, hardest cake to date but the time and effort payed off because it is also my favorite cake I have ever made!

I started out making two boxed cake mixes (yea, cheating. But since my class is more about decorating I let myself cut this little corner) and that produced 2-9in cakes and a dozen mini-cupcakes. I didn't need the cupcakes, so I frosted them with a light green buttercream and topped them off with a few extra flowers I had made (


I filled my cakes with my favorite ganache (2:1, choc:cream) and stacked them.


Using some thinned down buttercream frosting I created a crumb coat and allowed it to dry.


After it had set up (just at room temperature) I put on my frosting and smoothed it out with my large offset spatula.
 

Thanks to a handy little garland marking tool, I was able to seperate my cake into 8 even areas. I applied a lattice pattern on the sides of the cake, using the marks from the garland tool as a guide for starting and stopping my lines.


I applied the Corneille Lace pattern to the scallops on the top of the cake. (I had never used this technique before but after working on it for a while, it's one of my favorite patterns for a cake. Simple but elegant, and can be made in an size to give it a very different feel)


To help give the illusions of scallops, I made a very small star border around my lattice work (cleaning up all those messy edges I didn't bother cleaning up).


Wanting the top to look a little more elegant, I used a simple, small pearl border around the Corneille Lace.


Final touches to my cake included a larger, yellow shell border around the bottom of the cake (helping to cover up my very messy frosting job) and a few simple (pre-made) wild roses and drop flowers. I chose to make them in purple, because it really popped with the yellow and white frosting.


This is by far my favorite cake I've made. It's simple, elegant, and fun. It would work wonderfully as inspiration for a larger wedding cake, or even a nice birthday party, or a summer picnic.