Showing posts with label cupcakes. Show all posts

Tuesday, April 14, 2015

Seahawks Football Cake and Cupcakes

While football season may be a few months away, true fans celebrate with their team year round! And so is the case with this weeks cake. It was made for a 80 year old Seahawks super fan! He was having a large party with all of his kids, grandkids, and great grandchildren so we did a small cake and a bunch of cupcakes for everyone. We chose to do vanilla cupcakes with fresh raspberry filling and vanilla buttercream. 
For decorations I chose to make some chocolate football toppers (as always, I found the mold for these online at amazon). I used white chocolate for the laces and then milk chocolate for the footballs. They were adorable!


I also made some stars in Seahawk colors to be toppers as well, for those who did not want chocolate. 


I made up 100 vanilla cupcakes for the party, and also used dark blue and lime green cupcake papers to match the Seahawk team colors. 


I used an apple corer to cut out the center of the cupcakes. I cut off the inside but kept the top so that I could put it back on when they were filled. 


I made some amazing raspberry filling with some fresh raspberries (it was delicious!), then filled up all the cupcakes. 


I placed the tops back on so that the raspberry filling wouldn't spill out all over the place.


And then topped them with a light, fluffy vanilla buttercream.


This is what they looked like in the middle. They were one of my very favorite flavors to date! Absolutely amazing!


After they were all filled and frosted, I added all of the chocolate toppers and stars to the cupcakes. 


All stacked up and ready to go! :) I also made a small cake to cut. It was a small 6 in cake with blue and green stripes. I used a lot of the stars and footballs to make a little starburst topper to add to the top of the cake as well.


Once I got there and I was able to put it all together I was so pleased with the final product. The football and star topper looked wonderful and festive for the big surprise birthday party!


We made a large display for cupcakes as well. 


Everything looked amazing when it was all set up. I am actually really happy/surprised that I was able to match the Seahawks colors so closely (Americolor, if you are in need). I had such a fun time working on this project!
Go Seahawks!!!


Thursday, May 29, 2014

Silver 25th Anniversary Cake

A dear friend of mine is throwing her 25th wedding anniversary and asked me to make her a small cake with a cupcake tower. Her theme was the roaring 20s, flappers, feathers and jewels. And everything needed to be colored in silver, black, or white. 
I designed a small cake that would be silver with white flowers and white pearls frappe over every part of the cake. 
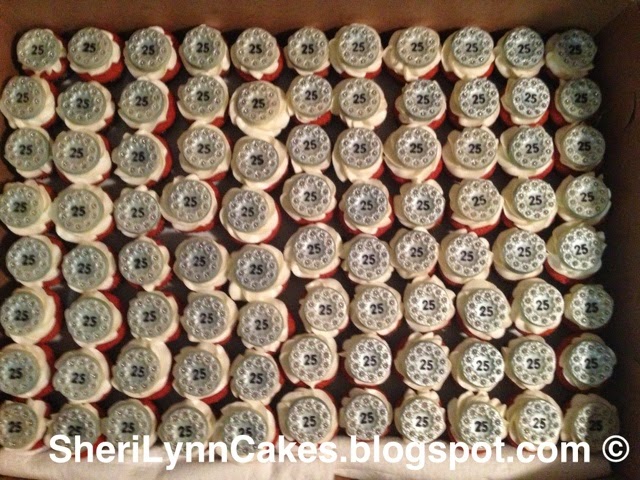
Once I knew what my cake would look like it was onto cupcake toppers. I found this really great chocolate mold that has '25' written in the middle of a circular medallion. I gathered up all my supplies a and started working. 


I made 200 little white chocolate discs


I used the Wilton Color Mist in Silver to spray the chocolate toppers and make them appear totally silver


The next step was to make the '25' stand out. I used the black Pearl Dust mixed with a little vodka to create a 'paint' which filled in the little number indents very well.
Though it was EXTREMELY time consuming!!! 
(14hrs total for these toppers start to finish!!!) 


ALMOST DONE!!! Lol! 
The next and last step is the bling :) we have to make these look ornate and like a brooch, so I need to use silver dragees. I added a little edible adhesive glue to the center of each little flower (around the edge) and added a small silver dragee. And as you can see the impact is worth the little extra time. 

 
And here is a close up of the finished product


I am completely in love with these! They're super cute and will even taste yummy! 

Now that those are done its time for me to start working on all the bits and pieces that I will need for my cake. 

The first thing to make are the gum paste flowers. I am only using white since she will be having a silver cake. I made a few roses and some small filler flowers for the topper

 
I also made up some gum paste numbers. '25' for this cake and '15' for a cake I was making the same day. The '15' was done in white gumpaste but later painted with the same black pearl dust as the inside of the '25' on the chocolate toppers, and the '25' was finished with some silver disco dust for a huge impact! 


I made a small little 6in round cake. Frosted it with cream cheese frosting, and piped Corneille lace all over. I then sprayed it with Wilton's Food Spray in Silver. It gave it a wonderful antiqued look. Then I placed the gum paste flowers and the feather topper on top. They looked amazing!!! I also draped some fondant pearls around the top to enhance the "roaring 20s" theme. 


I also frosted and topped all of my cupcakes.


They looked wonderful. I love the little toppers! And they're edible...even better! :) 


Once I arrived at the venue I was able to add the glittery '25' topper...and it looked FABULOUS!!!! Absolutely amazing and perfect for the party! 


And once it was stacked on the top of the cupcake stand it looked even better. I added some feather boas to the edges of the cupcake stand to make it look fancier and to help "carry" the feathers down the stand. 


It looked truly wonderful when finished! One of my favorite projects to date <3 <3 <3 


Thursday, April 10, 2014

Minecraft Creeper Cake w/Pig Cupcakes

My latest cake request came from my daughter's friend who is OBSESSED with Minecraft (who isn't? Lol!). She wanted a creeper cake with pink on it, so I decided to make some mini cupcakes with minecraft pigs on top. 
I had previously made a creeper cake (you can find a full tutorial here : http://sherilynncakes.blogspot.com/2013/10/minecraft-creeper-cake.html?m=1)

I made this cake in the same process that I had previously used, but I did add a pearl border to the top and bottom to jazz it up and make it look a little more feminine for her. 


I love it and think it turned out wonderfully. I enjoy doing cakes similar to those I have done before because it allows me to use the things I learned last time to make it better this time! :) 

Tuesday, April 9, 2013

Doll Dress Cake #2 w/Flower Cupcakes

My project this weekend was a birthday cake for my daughters friend's party. She was turning 7 and loved Princesses and her favorite color is Purple :) so this cake was a total winner for her! She was SO SO excited to see her finished cake!
I started by practicing with my new frosting tip (#070-a handy little ruffle tip that actually looks a lot like fabric!). I went around the outside of the pan to get a feel for it, and it actually worked out pretty well.

I also made some flowers to place on top of the cupcakes that will be going with this cake. I used pink and two shades of purple to make some simple drop flowers. And finished them off with edible glitter to make them shimmer.

The flowers ended up onto of the cupcakes for the party. They turned out AMAZING!!! I loved them SO SO SO much! They were simple vanilla with whip kreme buttercream but everyone was in love with them.


Now it was time to decorate the cake. She wanted the dress to be pink and purple so we started with a pink crumb coat (purple frosting filling inside the cake) and added extra pink frosting on the front so that the front of her skirt could be a pink Corneille lace pattern. Because she loves princesses, I made sure to add a lot of glitter on the front/pink part of the skirt.


I then added layer after layer of ruffles (the pics look kind of blue but it was just a dark plum purple) until we finished the bottom of the dress, as well as adding a simple beaded border to the bottom and front of the dress to help finish off the edges. I also added one of the light purple glittery flowers(and two small white ones) to the front of the dress to help finish it off.


I was really happy with it, so of course something had to happen! Haha! Well, my cake cooling rack fell over and smashed into the side of my cake ripping off 4 layers of ruffles (which cannot be added in easily). To avoid disaster I was able to add a bunch more layers of ruffles, but it was a rather tricky fix.
Then on the way there, the extra ruffles were too heavy and the back/top ruffle started to rip and tear but that's alright...it's in the back! Hahaha! That's what I kept telling myself to stay calm and not freak out on my husband while we were driving! Lol!
Despite everything...It ended up looking wonderful! The birthday girl (and everyone else) loved it!!! :) I had a ton of fun making this cake and was so happy with how the cupcakes turned out! Everyone was happy and went back for seconds, so I would say this project was a success.

Tuesday, February 12, 2013

Figure Piping

This week in class we learned a wide variety of figure piping skills. A very wide variety :)

The first few that we learned were birds - ducks, swans, and a stork. I love these animals! They are adorable and can be used in so many ways on so many different themed cakes. I can't wait to try them on a real cake.


The next is a very adorable creature. It is supposed to be a dinosaur. I think he makes an awfully cute dragon. But in all honestly...he looks like an alligator. Haha! :) Whatever he is he is cute! It'll be interesting to find out how to use him on cakes. Maybe at the bottom of a volcano or in a little nest. I'll have to experiment with him.


The next thing I learned to pipe were grapes (like I said, a wide variety of things this week). I had the wrong tip this week, one size larger, so my grapes are more like table grapes and less like wine grapes but they work.


And the last thing that we worked on were clowns. Belch! I am not a fan. Will probably never make these again but it was an important lesson on spacing and placing things on the cake.