Showing posts with label ruffles. Show all posts

Tuesday, April 9, 2013

Doll Dress Cake #2 w/Flower Cupcakes

My project this weekend was a birthday cake for my daughters friend's party. She was turning 7 and loved Princesses and her favorite color is Purple :) so this cake was a total winner for her! She was SO SO excited to see her finished cake!
I started by practicing with my new frosting tip (#070-a handy little ruffle tip that actually looks a lot like fabric!). I went around the outside of the pan to get a feel for it, and it actually worked out pretty well.

I also made some flowers to place on top of the cupcakes that will be going with this cake. I used pink and two shades of purple to make some simple drop flowers. And finished them off with edible glitter to make them shimmer.

The flowers ended up onto of the cupcakes for the party. They turned out AMAZING!!! I loved them SO SO SO much! They were simple vanilla with whip kreme buttercream but everyone was in love with them.


Now it was time to decorate the cake. She wanted the dress to be pink and purple so we started with a pink crumb coat (purple frosting filling inside the cake) and added extra pink frosting on the front so that the front of her skirt could be a pink Corneille lace pattern. Because she loves princesses, I made sure to add a lot of glitter on the front/pink part of the skirt.


I then added layer after layer of ruffles (the pics look kind of blue but it was just a dark plum purple) until we finished the bottom of the dress, as well as adding a simple beaded border to the bottom and front of the dress to help finish off the edges. I also added one of the light purple glittery flowers(and two small white ones) to the front of the dress to help finish it off.


I was really happy with it, so of course something had to happen! Haha! Well, my cake cooling rack fell over and smashed into the side of my cake ripping off 4 layers of ruffles (which cannot be added in easily). To avoid disaster I was able to add a bunch more layers of ruffles, but it was a rather tricky fix.
Then on the way there, the extra ruffles were too heavy and the back/top ruffle started to rip and tear but that's alright...it's in the back! Hahaha! That's what I kept telling myself to stay calm and not freak out on my husband while we were driving! Lol!
Despite everything...It ended up looking wonderful! The birthday girl (and everyone else) loved it!!! :) I had a ton of fun making this cake and was so happy with how the cupcakes turned out! Everyone was happy and went back for seconds, so I would say this project was a success.

Advanced Borders & Ruffles

I am so glad to be back in class! Yay! Spring break is great and everything but a whole month off of classes was boring. Haha!
This class was a simple Intro to Level 2 class, with a little work on embellishing borders and color techniques (and I asked my teacher about a few different ruffle tips, so we got a little tutorial on that too).

The first thing we worked on was a rope border(tip#14). She showed us two different ways to achieve this look. It took me a while to get it down but you can see that it starts to get a little better at the end

.

This picture shows the many different ways to achieve a similar 'rope' look. One of which was an 'E' motion border(tip#14). It is a very versatile border technique. Spacing it out will give you a look that's more similar to rosettes while getting it in tight together would give you more of a rope look.


We then worked on the 'C' motion border(tip#14). This is a less versatile border/decoration technique but would really come in handy for a beach/pirate/mermaid/water themed cake.

Rosettes(tip#14) were next. They are a simple a wonderful decoration that adds to the cake/cupcake quickly and easily.


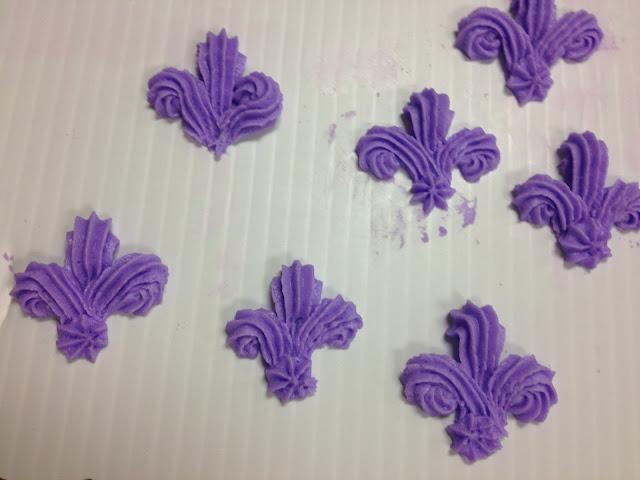
Another fun decoration that adds a lot to a simple cake is the buttercream Fleur-de-Lis(tip#14). It isn't extremely speculator by itself but adding some small dots or extra embellishments to this in a simple pattern adds a lot of visual interest to cakes.

The same thing could be said about the next border we worked on, the crown border(tip#14). It's not very stunning by itself but adding broaches, sprinkles, flowers, or even more buttercream decorations around the border really do create something spectacular.

We worked on two different types of swags next. These will come in handy to accent round cakes, doll dress cakes, or other fancy fabric style cakes.
The first fabric swag(tip#104) looks more like fabric to me and reminds me of a princess dress or something. I really like this one.

The next style we worked on was a ruffle zigzag swag(tip#14). This style seems a little less versatile than the other one but it really does look pretty. Haven't figured out how to use this one yet but I am sure I will find a need for this soon.

We then worked on a technique that uses the petal for a 5-petal drop flower as a border(tip#104), or even potentially to fill a cake giving the illusion similar to ruffles. (THE PICTURE USED IS ONE TAKEN AFTER I HAD PLACED TWO COLORS OF ICING IN THE BAG) This technique really reminds me of fish or mermaid scales. I think it could be very pretty in an ombré style around the entire cake.

I also worked on a simple reverse shell pattern. While it's simple, the visual impact is great. I really liked this border.


The next technique we worked on was simple vine and scroll work(tip#14). Very gorgeous on the side of the cake!!!


To help emphasize a border we learned how to properly embellish a simple shell border to look like the border below. By stacking different borders on top of each other or next to each other you can achieve a very intricate detail for your cake.


Another thing we worked on this week was color striping and color stripping. We took two separate bags and painted food coloring inside one of the bags to give the stripped look to the white buttercream.


The second bag was used to fill a bag with purple AND white (in pastry bags, placed inside of one plastic bag) to give a wonderful color block illusion.

Using a new tip(#070) and the bag with the color striping, I was able to achieve a very cool fabric ruffle design. I loved it!!!


Monday, March 11, 2013

My First 2 Tier Cake!!!

I was both nervous and excited to make a tiered cake! It is very intimidating! But it really is not as hard as one would think, at least for my tiny 2 tier cake.
Due to the complexity of the work this week (and outside factors/stresses that had nothing to do with the cake) I did not take as many pictures as I would've wanted. I stacked my cakes and began decorating before taking many pics. Sorry!!! I feel horrible, but like I said it was just not my week.

I began by baking two 9inch round cakes, and two 5inch rounds (that I actually cut out of a 13x9 cake pan). I filled them with ganache, crumb coated, and frosted them.
I stacked them by placing 4 cut-off dowels under the area I was stacking my 5in round. After sprinkling a little dehydrated coconut between the layers, and placing the 5inch cake on a foil covered cardboard (I could only find a 6inch board, so I had to make sure my frosting covered up the edges so they didn't show), I placed the smaller cake on top. To help secure the cake I sharpened two dowels and hammered (yes, with an actual hammer!) them all the way through both layers of cake/cardboard. This really helps make sure the cake does not shift in transport.
After they got stacked, we have free reign to do whatever designs we wanted for our class final. One of my favorite design techniques is the Corneille Lace so I had fun and played around with it.
I decided to use a large, dark purple ruffle as a border to help cover the cardboard. And even though it looks kind of blue in the picture it was a awesome royal blue color.


I had a lot of left over flowers from my projects a week or so ago. So I decided to turn this into a Cascading Flower cake! I have been obsessed with them lately and thought this was a good opportunity to learn how to make that work well (with great instruction from my teacher!!!)
I started by figuring out exactly where I wanted the flowers placed. Using a 'S' shape to help them look more natural as the fall down the side, I was able to find flowers that worked and fit onto the cake well. I also placed a big glob of green frosting on the top of the cake and stacked some of my buttercream roses.


After getting the bulk of the flowers on, my teacher helped me make it more natural looking by continuing the flowers onto the border and adding leaves in a few select places.


I think it looks great! The colors are not really what I would use for a wedding cake but this was more inspired by my daughter than a wedding. Maybe it's a classy birthday cake or something. I don't know but this week I was more focused on the techniques used than the styling of the cake. Using my last class as a opportunity to get as much knowledge out of my teacher as possible :)