Class this week was centered around different royal icing flowers and leaves.
The first flower we worked on was a violet. 2 small petals on the bottom, 3 on the top with two little dots in the middle to finish it off. Very cute!
Then I put them in the flower formers to help them get a more natural look.
The next flower we made were pansies, Purple and yellow this time, though they can come in a variety of colors.
You make them by making 2 (yellow) petals on the bottom, followed by another two smaller petals on top of those two. And adding 3 petals to the top, however with these petals I did not make them individually, I just continued piping until all three petals were made.
I placed them in flower formers to dry, and added a tiny little yellow circle to the middle of each flower. This connects the two colors a little better and makes it look a little more life-like.
Another way to make them a little more realistic is using a very tiny paint brush or toothpick and painting little 'faces' on them with violet color gel. It really helps make them look better.
The next flower we worked on was ridiculously simple! A very tiny Forget-Me-Not. Beautiful and simple. I LOVED them!!! Using a tip#101s I made a simple 5-petal flower, which came out extra tiny but adorable.
Next we learned how to make a few flowers in a lily nail. We covered the nails in foil covered with a TINY bit of shortening, to make it easier to remove the flowers later.
The fist flower was a purple petunia.
For the stamens I used some lily stamens first.
And then fancy pearl stamens, giving each of them a slightly different look.
Switching to white royal icing and a leaf tip (354 I think...) to make the Easter Lilies.
I loved them! I made all the petals and then went back and place the lily stamens in the middle, adding extra royal icing so they didn't fall down.
I was lazy when making the next flower and I didn't color the frosting. So I ended up with white poinsettias but still beautiful. Honestly one of my favorite flowers I have made so far. It would be fun to cover them in red and gold luster/disco dust! :)
And after making all those flowers, some greenery is needed! :) so of course we worked on some simple leaves with the #102 tip. They are nice and will work with many different types of flowers.
And some beautiful holy leaves for Christmas time :)
And an adorable Christmas tree, or bush, or whatever else I would like to make this into. It's pretty easy. Using a leaf tip (like I did), or a star tip, I worked from the bottom to make the tree. As you can see I need to work on the top of it, but you get the idea. Haha :)
Blog about cake decoration and design, pictures and tutorials of cakes and frosting flowers, borders, and decorations.
Showing posts with label frosting. Show all posts
Thursday, April 18, 2013
Tuesday, April 9, 2013
Advanced Borders & Ruffles
I am so glad to be back in class! Yay! Spring break is great and everything but a whole month off of classes was boring. Haha!
This class was a simple Intro to Level 2 class, with a little work on embellishing borders and color techniques (and I asked my teacher about a few different ruffle tips, so we got a little tutorial on that too).
The first thing we worked on was a rope border(tip#14). She showed us two different ways to achieve this look. It took me a while to get it down but you can see that it starts to get a little better at the end
.
This picture shows the many different ways to achieve a similar 'rope' look. One of which was an 'E' motion border(tip#14). It is a very versatile border technique. Spacing it out will give you a look that's more similar to rosettes while getting it in tight together would give you more of a rope look.

We then worked on the 'C' motion border(tip#14). This is a less versatile border/decoration technique but would really come in handy for a beach/pirate/mermaid/water themed cake.
Rosettes(tip#14) were next. They are a simple a wonderful decoration that adds to the cake/cupcake quickly and easily.

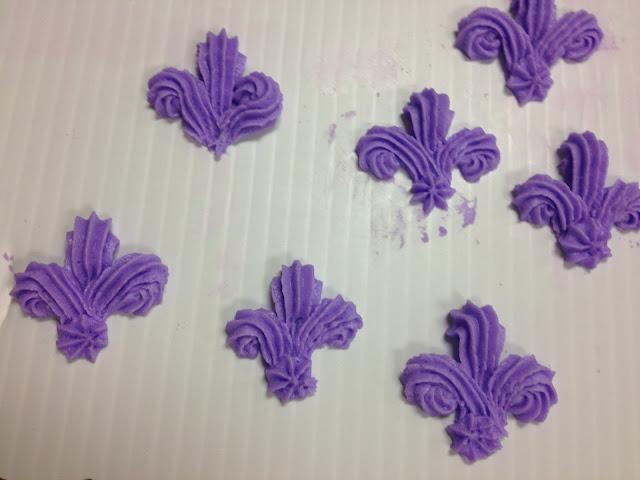
Another fun decoration that adds a lot to a simple cake is the buttercream Fleur-de-Lis(tip#14). It isn't extremely speculator by itself but adding some small dots or extra embellishments to this in a simple pattern adds a lot of visual interest to cakes.
The same thing could be said about the next border we worked on, the crown border(tip#14). It's not very stunning by itself but adding broaches, sprinkles, flowers, or even more buttercream decorations around the border really do create something spectacular.

We worked on two different types of swags next. These will come in handy to accent round cakes, doll dress cakes, or other fancy fabric style cakes.
The first fabric swag(tip#104) looks more like fabric to me and reminds me of a princess dress or something. I really like this one.
The next style we worked on was a ruffle zigzag swag(tip#14). This style seems a little less versatile than the other one but it really does look pretty. Haven't figured out how to use this one yet but I am sure I will find a need for this soon.
We then worked on a technique that uses the petal for a 5-petal drop flower as a border(tip#104), or even potentially to fill a cake giving the illusion similar to ruffles. (THE PICTURE USED IS ONE TAKEN AFTER I HAD PLACED TWO COLORS OF ICING IN THE BAG) This technique really reminds me of fish or mermaid scales. I think it could be very pretty in an ombré style around the entire cake.
I also worked on a simple reverse shell pattern. While it's simple, the visual impact is great. I really liked this border.

The next technique we worked on was simple vine and scroll work(tip#14). Very gorgeous on the side of the cake!!!
To help emphasize a border we learned how to properly embellish a simple shell border to look like the border below. By stacking different borders on top of each other or next to each other you can achieve a very intricate detail for your cake.
Another thing we worked on this week was color striping and color stripping. We took two separate bags and painted food coloring inside one of the bags to give the stripped look to the white buttercream.
The second bag was used to fill a bag with purple AND white (in pastry bags, placed inside of one plastic bag) to give a wonderful color block illusion.
Using a new tip(#070) and the bag with the color striping, I was able to achieve a very cool fabric ruffle design. I loved it!!!

This class was a simple Intro to Level 2 class, with a little work on embellishing borders and color techniques (and I asked my teacher about a few different ruffle tips, so we got a little tutorial on that too).
The first thing we worked on was a rope border(tip#14). She showed us two different ways to achieve this look. It took me a while to get it down but you can see that it starts to get a little better at the end
.

This picture shows the many different ways to achieve a similar 'rope' look. One of which was an 'E' motion border(tip#14). It is a very versatile border technique. Spacing it out will give you a look that's more similar to rosettes while getting it in tight together would give you more of a rope look.

We then worked on the 'C' motion border(tip#14). This is a less versatile border/decoration technique but would really come in handy for a beach/pirate/mermaid/water themed cake.
Rosettes(tip#14) were next. They are a simple a wonderful decoration that adds to the cake/cupcake quickly and easily. 
Another fun decoration that adds a lot to a simple cake is the buttercream Fleur-de-Lis(tip#14). It isn't extremely speculator by itself but adding some small dots or extra embellishments to this in a simple pattern adds a lot of visual interest to cakes.
The same thing could be said about the next border we worked on, the crown border(tip#14). It's not very stunning by itself but adding broaches, sprinkles, flowers, or even more buttercream decorations around the border really do create something spectacular. 
We worked on two different types of swags next. These will come in handy to accent round cakes, doll dress cakes, or other fancy fabric style cakes.
The first fabric swag(tip#104) looks more like fabric to me and reminds me of a princess dress or something. I really like this one.
The next style we worked on was a ruffle zigzag swag(tip#14). This style seems a little less versatile than the other one but it really does look pretty. Haven't figured out how to use this one yet but I am sure I will find a need for this soon.
We then worked on a technique that uses the petal for a 5-petal drop flower as a border(tip#104), or even potentially to fill a cake giving the illusion similar to ruffles. (THE PICTURE USED IS ONE TAKEN AFTER I HAD PLACED TWO COLORS OF ICING IN THE BAG) This technique really reminds me of fish or mermaid scales. I think it could be very pretty in an ombré style around the entire cake.
I also worked on a simple reverse shell pattern. While it's simple, the visual impact is great. I really liked this border. 
The next technique we worked on was simple vine and scroll work(tip#14). Very gorgeous on the side of the cake!!!
To help emphasize a border we learned how to properly embellish a simple shell border to look like the border below. By stacking different borders on top of each other or next to each other you can achieve a very intricate detail for your cake.
Another thing we worked on this week was color striping and color stripping. We took two separate bags and painted food coloring inside one of the bags to give the stripped look to the white buttercream.
The second bag was used to fill a bag with purple AND white (in pastry bags, placed inside of one plastic bag) to give a wonderful color block illusion.
Using a new tip(#070) and the bag with the color striping, I was able to achieve a very cool fabric ruffle design. I loved it!!!

Labels:
'C''E' motion,
border,
buttercream,
color striping,
crown,
drop petal detail,
embellished border,
Fleur de Lis,
frosting,
reverse shell,
ribbon swag,
rosette,
ruffles,
scroll work,
vines,
zigzag swag
Thursday, February 7, 2013
Baby Buggy Cake
My first real cake project for my class was a baby shower cake shaped like a baby buggy. My daughter helped me color my frosting, so it's a baby girl's cake.
I started with a regular 9x13 white cake, a ganache filling and 3 batches of a stiff buttercream frosting.
After bringing my cake to class we split and filled out cakes to prep them for cutting and frosting.
I cut the top of the buggy out, turned that portion into the wheels, and rounded off the rest of the corners.
After cutting the cake, I thinned out some frosting and covered all my cut edges in frosting as a crumb coat. (I wish I had pictures of this part but my hands were covered in ganache and buttercream)
I learned how to make a basket weave, star, and zig zag this week. I obviously need to practice on making things a little tighter, but not bad for my first cake.
I started with a regular 9x13 white cake, a ganache filling and 3 batches of a stiff buttercream frosting.
After bringing my cake to class we split and filled out cakes to prep them for cutting and frosting.
I cut the top of the buggy out, turned that portion into the wheels, and rounded off the rest of the corners.
After cutting the cake, I thinned out some frosting and covered all my cut edges in frosting as a crumb coat. (I wish I had pictures of this part but my hands were covered in ganache and buttercream)
I learned how to make a basket weave, star, and zig zag this week. I obviously need to practice on making things a little tighter, but not bad for my first cake.
Labels:
baby,
Baby shower,
buggy,
buttercream,
cake,
decorate,
frosting,
ganache,
green,
pink
Subscribe to:
Posts (Atom)