Showing posts with label blue. Show all posts

Tuesday, May 6, 2014

High Heel Mini-Cupcakes

I am sure you have seen pictures of this new 'trend' for cupcakes online, they are high heel cupcakes! Yay! What does a girl love more than cupcakes? Shoes!!! 
I was so excited when I had a friend ask for some I could barely contain myself. Oh the possibilities!!! Haha! I was given a color scheme of White, Silver, and Turquoise to work with. Adorable! I couldn't wait to get started! 
I began by looking at pictures online to get inspiration for decoration (none of the tutorials were extremely helpful with construction ideas however, since I am using mini cupcakes and will have to use different materials to make my cupcake heel). I decided that a combination of bows, flowers, and swirls would be best to decorate the cupcakes. 
The swirls would be piped on with buttercream, so no prep needed there. But the other decorations would need to be made out of fondant beforehand. 
I made my own fondant with some mini-marshmallows, water, and powdered sugar. If you've never made your own marshmallow fondant before - simply microwave around a cup marshmallows with a little over a tsp or so of water. When the marshmallows start to swell, remove them from the microwave and add powdered sugar until it forms a dough. Continue to kneed it together until it forms a fondant texture. Use shortening and powdered sugar to help get the correct consistency. 
I made up my white toppers, then covered them with some white pearl dust. I also made up some extra toppers with white fondant that were then sprayed with silver Wilton Food Color Spray. I then made up some turquoise fondant to make bows and flowers.
I added some edible adhesive to the centers of each flower and added white sprinkles or silver dragees to the adhesive. I was really excited with the end result! They look adorable! I cannot wait to put them on the cupcakes! 


Since the colors are white, silver, and turquoise, and they wanted red velvet flavor for the cupcakes I just made them turquoise velvet cupcakes instead. 


With white and blue cream cheese frosting


While I was waiting for my blue velvet cupcakes to cool, I made a test high heel :) I used a oblong butter cracker for the soul of the shoe, added a small amount of frosting to the back and attached a pretzel heel. It worked pretty well for regular chocolate frosting.


After I was sure about the best way to put them together, I started piping blue and white frosting onto each one and then added on the cooridinating toppers. They looked ADORABLE!!!!!! I had to put them in a box to transport them but it worked pretty well (this is box one of two).


When I finally got there only a few of them had broken heals, which were easily repaired. 
I set them up on my cupcake stand and they looked amazing!!! 


They were definitely a fun (but time consuming) project! So happy I got to do them though because they were worth every bit of it!!! :)

Saturday, July 6, 2013

Drop Flower Chocolate Cake

My mother in laws birthday was yesterday, so I decided to whip her up a quick cake. She is on a gluten-free diet and (thanks to Betty Crocker) I was able to make her one!
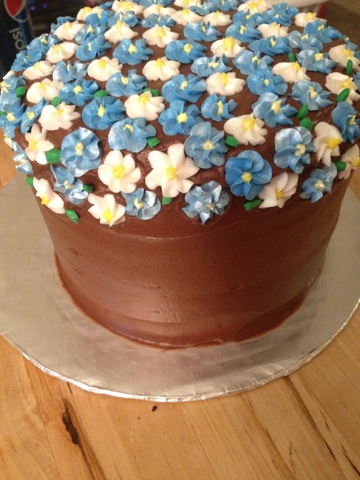
I know she loves chocolate, so I made a devils food cake, with PB/chocolate filling and chocolate frosting. I used a 6in pan, and did three layers to achieve the height that I wanted. 


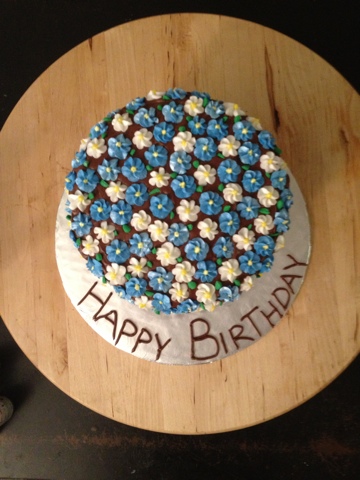
Those kind of cakes, though absolutely delicious, are not always the prettiest. So, to make it a little more special I started to added some royal icing drop flowers (that had been sprayed with a pearl glitter spray)....


...lots of them! Allowing them to cascade over the sides.

 I also added some green leaves...


....a chocolate pearl border...


...and a happy birthday message on the cardboard.


It was absolutely delicious! I was super impressed with the Betty Crocker gluten-free cake mix! It's awesome! Yay for finally allowing many people to make yummy cakes at home again! Love them for that!!! 

I was really happy with the end result (and so was my MIL)! It looked gorgeous and tasted even better. And didn't take me any time at all! Gotta love the easy, show stopping cakes! :) 


Monday, April 29, 2013

Sunflower Fondant Cake

My class this week focused on fondant. I had worked with fondant before but I had never covered a whole cake with it. Only to make small things (like cupcake toppers). However it turned out well. I was just playing around. There is no real occasion for this cake, but my friends are going to enjoy it. :)


I started out with two 8in (vanilla) round cakes, cut to be even on top, and then cooled.


I then used a simple ziplock bag (this was such a small area I didn't feel the need to dirty a pastry bag) to pipe a little barrier to help hold in my ganache/buttercream mixture.


Then filled it with a yummy combination of buttercream frosting and a ganache that I just couldn't get to set up (and I didn't have time to melt more chocolate into it either). But it tasted really yummy and it spread onto the cake very well.


After stacking the two cakes, I used a thinned down buttercream frosting to crumb coat the cake. Because we were adding fondant to this cake I did add a little more buttercream than I normally would to help it taste better for those that hate (and pick off the) fondant.


I was going to make my fondant but due to a crazy schedule this week, I just bought a tub of it. Much easier. A little more expensive. But for my schedule this worked best.

Once I got to class, I kneaded my fondant (using a little shortening to help keep the fondant from sticking) until it was nice and pliable. I used this time to add a little cheesecake flavoring, the oil based flavors used for candy making. Awesome! Now I have a yummy flavored Cheesecake Fondant! :) Then I rolled it out large enough to make sure the top (8in) and both sides (3-4in each) of my cake were properly covered. And flipped it on top of my cake.


Slowly, working from the top to the bottom, I rubbed the cake and helped it stick and smooth onto the buttercream below. Once I reached the bottom I used a pizza cutter to remove any excess fondant that remained around the bottom of my cake and smoothed it down.


After coloring my fondant blue, yellow, and orange, I started decorating.

I used some molds (pearl border and swags) to help make decorations for the cake. Using a lot of corn starch on the fondant and dusted on the mold. I had a few places where the swags stretched and ripped a little but they turned out alright as long as you don't look for a long time.

And the yellow pearl border across the bottom of the cake was simple, easy to add more or to fix if I messed it up, and stunning!


I made fondant flowers by using a silicone mold and two different colored fondants. The center of the flower was a cute little button.
I also dusted the swags with a white pearl luster dust. And I dusted the flowers with a gold luster dust all over to give them a warm feeling.


I made a sunflower cake topper to help make the cake look a little more finished. And added two simple leaves. All made using a plastic mold, cornstarch, and fondant.
To help complete the look I also dusted the sunflower with luster dust. I used Gold on the yellow, a cantaloupe colored luster dust on the orange, and a pretty green shimmer on the leaves.

And it's finished and ready to eat! :)


Sunday, February 10, 2013

Buttercream Flowers

Ooohhh! I am so excited to share this with you this week! One of my favorite weeks so far (saying a lot since its only my 3rd cake class ever! Haha!).
I am extremely excited with the many color and size possibilities for these flowers. Can't wait to play with them more!

The first flower I learned was a simple 5 petal flower, which could be used for any flower from a wild rose to a small cherry/apple blossom. Very versatile!


The next flower (one of my personal favorites!) is the sweet pea. A very simple and small flower, which can be piped onto a rose nail or directly on the cake. I love this delicate, small flower. Could be beautiful all over a cake in various colors.


We learned two different methods to make the next flower, a daffodil. Both worked but the second method is my fav! I think it just looks a little more natural, it does require a little more finesse but it's worth it. We also used orange piping gel for the inside detail. I love these! Super cute for a springtime cake!


And now onto our regular roses. We are making our roses on rose sticks, which I originally thought would be harder than the nail but I was super impressed with look of the finished roses. The first rose was a rose I made after switching colors, giving me the ombré effect. The second rose was just my traditional rose. I know they need work! Lol! 


After those we moved onto daisies. I had a harder time with these, but there were two techniques and the second (resulting in a hippy style daisy) was the one that I gravitated towards. It was easy and produced a nice result.


After that we worked on some bachelor buttons, one of my favorite real flowers. They turned out well, but I think I would've liked them better if I had colored them more accurately.


Our final flowers were the VERY basic drop flowers. Pretty simple buy used often in cake decorating.