Showing posts with label Gum paste. Show all posts

Thursday, May 16, 2013

White and Gold Gum Paste Roses

My class project this week required that I make all my decorations ahead of time because we wouldn't really have enough time in class to make them. 
I decided to make a cake that had gum paste roses on top. And never having made them before, I was excited for the challenge. 
I saw a tutorial online for making a gum paste rose with only a circle cutter, so I was prett confident that I could handle it. 

I started by cutting out my gum paste circles. I smoothed the edges with a ball tool and left them in a flower former to help them begin to dry. 


I found that working with them quickly, and not making too many up in advance, was best. Letting them dry too long would make them crack a little when I tried to mold them. 


I bought some simple rose cores from Wilton to make this process a little faster/easer. It REALLY helped! I highly suggest the splurge! 
I started with the small petals, applying them around the core until it looked like a small rose bud center.


I made sure to put the leaves in groups of  3 & 5 as I went around to help it look more like a rose. 


After I had a row of 3 and 5 small petals, I moved on to the medium sized petal. Placing 3, then 5 petals around the rose bud I had already created. Making sure to turn the petals out and shaping them as I went.


Then the largest leaves got put on (also in groups of 3 & 5). And I ended up with something that looked pretty close to a real rose. 


And I kept going until I had 6 roses finished. 


Then I dusted all over the petals with pearl dust and outlined the petals with a gold luster dust to give them dimension and make them look 'antiqued'. 


Excited to see how they look ontop of the cake tomorrow!!! :) 

Wednesday, May 15, 2013

Purple Topsy Turvy Rose Cake


Time to make a fun crooked or topsy turvy cake! It's my last week in class so I wanted to make it really fun and challenging. 
I had to make all of my decorations the week before so they would have enough time to dry when I put them on the cake.

I made a bunch of small gum paste pearls and threw them in a plastic bag with a tiny pinch of gold luster dust. After rolling them around for a second they were all covered and ready to go. 


I also made some larger gum paste pearls, but covered those with just a white pearl color. They looked wonderfully shiny when they got done. 


I knew I was going to use the pearls as a border on the largest bottom tier, so it was time to figure out what I wanted my second tier to look like. To help keep the look clean and elegant I ended up picking a bow and ribbon to finish off the top tier.
I had to make a bow (simply rolling out my gum paste, cutting long ribbons, and folding them over a paper towel round)


And of course the ribbon ends that fall nicely over the edges. 


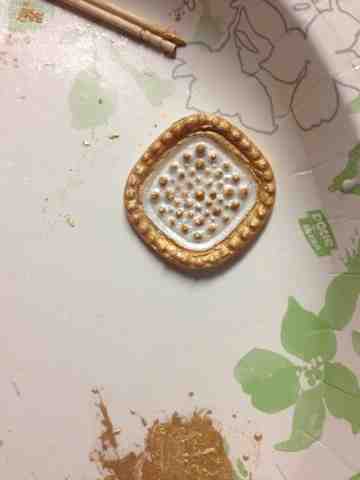
I decided to make a pretty brooch for the inside of the bow instead of just finishing it off with a gum paste ribbon. 
I used a Wilton jewel mold to make this pretty little brooch. It worked really well! 


Once it dried a little bit, I brushed it with some pearl luster dust. Because a brooch can't be matte! It must be shiny! Lol! :)


Then I took some gold luster dust(+vodka) and painted a few of the details, helping them pop. I love how it turned out!!! 


I also had some gum paste roses I had made a few days earlier (see previous post for tutorial/more pictures).


After dusting the roses with a little pearl and gold luster dust, I packed everything up so it didn't get broken before my class this week. 


I baked a variety of flavors this week, because a crooked cake shouldn't take itself too seriously, it's a fun cake! :) 
So the top (6in) tier is chocolate/vanilla/chocolate. And the bottom tier is key lime/vanilla/orange. With a standard buttercream as filling for both.
I started with a 6in and 9in cake, placed on a 5in and 8in cardboard. I turned them upside down and carved a slight slant into the sides of the cake so the base of each tier was fit onto the smaller cardboard. 


I used a 6in cardboard to carve a hole in the top of my bottom cake, as well as carving a slight slant into the top of both tiers.


I covered both tiers with a dark purple fondant and stacked them so that the slants on the tops went different directions. 
I also added the premade pearls to the bottom tier (alternating colors/sizes). 


To finish the cake off, I placed the gum paste bow between the two tiers with a little buttercream icing, and made a quick gum paste ribbon to drape around the entire thing. 
I also added the gum paste roses to the top, and decorated it with a few more leaves to help complete the look. 


It turned out so fabulously!!! 


Absolutely the best cake I have made so far! I love it! Love it! Love it!
Fun, funky, elegant, PERFECTION!!!! :)