Saturday, June 14, 2014

Edible Cameo Brooches

Hello Everyone! <3 I am really excited to bring you this tutorial today. I looked everywhere online for a tutorial for chocolate cameos when I was making these and couldn't find anything. I hope this tutorial helps you, or inspires some new ideas for you, while working on your projects :) 
I found this wonderfully beautiful cameo brooch chocolate mold at my local decorating store. I am sure you can find them online as well if you do not have a cake/candy supply store near you. 
I melted some white chocolate and, using a small paint brush, applied it to the "face" of the cameo brooch. I let that set up in the freezer for a minute or two before I added the colored portion to the back. 


For this project I used pink candy melts and white chocolate to make a very soft pink color for the background of the cameos. 
I filled them up with a small amount of the
Pink chocolate mixture, tapped it down to help fill in all the gaps, bring all the bubbles to the surface, and smooth out the top. 


After returning them to the freezer for another minute or two so they could set up, I simply tapped the mold on the table and they popped out. IF you're having problems getting the chocolates out of the mold, pop it back in the freezer for a while longer...it might now be solidified enough to come out nicely. Chocolate that has been tempered properly will also have a nice shine when it comes out of the mold as well. 


Since the brooches were missing something, I decided to paint the rope border gold. I used a little shimmer dust and vodka to make a paint and simply brushed it on. I did have to do two layers to make sure it would stick. Next time, however, I am going to paint the rope border on with a corresponding chocolate color so I don't have to spend so much time painting the gold on. 


BUT with all that being said...THESE ARE MY FAVORITE TOPPERS EVER!!! Oh my! I am in love with these and want to make some in every color now! Obsessed doesn't even begin to describe how I feel about these. Lol! I know, I know...I am gushing! But like I said, with no tutorial I was really crossing my fingers and hoping they would turn out okay. And obviously I am beyond pleased with how they turned out!


Gorgeous! Gorgeous! Gorgeous! And yummy! Can't beat it!


And since these were going to a vintage tea party themed bridal shower, I wanted to make these blend in with the other fondant decorations so I added purple flowers to help frame the bottoms.

ADORABLE!!! Haha! I know I keep saying that but these are my new favorite thing! 

 
Just so pretty :) 

And these are all the other fondant details that will be on the cupcake toppers : 


Perfect for a summer vintage tea party bridal shower <3 <3 <3 

Tuesday, June 10, 2014

Rose Bridal Shower Cake

Summer has begun! Hooray for flip-flops, farmers markets, fresh berry lemonaid, and...the beginning of wedding season! :)
My first "summer" project was a simple/small bridal shower cake. I received a call the night before it was needed and was asked to make something "girly and fun" for a friends' surprise bridal shower.
I quickly baked up a simple 6in vanilla cake with a creme bokay frosting. 
I decided to tint the frosting a soft pink and do a simple rosette cake. I began piping buttercream roses along the side in two rows. There were small areas where the cake was showing through, so  I piped a little star shaped flower in the holes and added 3 pearls to the center of those star flowers. 

    (Ignore my ugly background. Lol!)

After the sides were completed I moved into the top. I didn't have enough frosting to make a bunch of little rosettes on the top so I made one large rose that covered the entire top of the cake. 
When I finished the rose on top I added marshmallow fondant pearls as a border to the top....


...as well as the bottom. 


I absolutely LOVE this cake!!! It was simple and since I didn't spend too much time planning it I didn't over think it and it was wonderful in its simplicity! 


Such a perfect little bridal shower cake! I love this so much! Can't wait to experiment with this rosette technique on other cakes/projects. The visual impact is really stunning! 

Thursday, May 29, 2014

15th Anniversary Cake

This was a simple cake that I put together quickly for a 15th anniversary. I used cream cheese frosting as a base and added fondant details to the top of that. I used simple stripes and pearls, but added a '15' to the top. 


It turned out well for a last minute cake :) simple but elegant

Silver 25th Anniversary Cake

A dear friend of mine is throwing her 25th wedding anniversary and asked me to make her a small cake with a cupcake tower. Her theme was the roaring 20s, flappers, feathers and jewels. And everything needed to be colored in silver, black, or white. 
I designed a small cake that would be silver with white flowers and white pearls frappe over every part of the cake. 
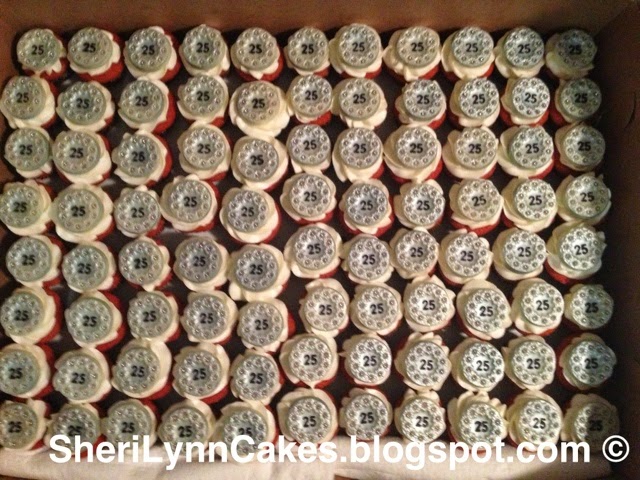
Once I knew what my cake would look like it was onto cupcake toppers. I found this really great chocolate mold that has '25' written in the middle of a circular medallion. I gathered up all my supplies a and started working. 


I made 200 little white chocolate discs


I used the Wilton Color Mist in Silver to spray the chocolate toppers and make them appear totally silver


The next step was to make the '25' stand out. I used the black Pearl Dust mixed with a little vodka to create a 'paint' which filled in the little number indents very well.
Though it was EXTREMELY time consuming!!! 
(14hrs total for these toppers start to finish!!!) 


ALMOST DONE!!! Lol! 
The next and last step is the bling :) we have to make these look ornate and like a brooch, so I need to use silver dragees. I added a little edible adhesive glue to the center of each little flower (around the edge) and added a small silver dragee. And as you can see the impact is worth the little extra time. 

 
And here is a close up of the finished product


I am completely in love with these! They're super cute and will even taste yummy! 

Now that those are done its time for me to start working on all the bits and pieces that I will need for my cake. 

The first thing to make are the gum paste flowers. I am only using white since she will be having a silver cake. I made a few roses and some small filler flowers for the topper

 
I also made up some gum paste numbers. '25' for this cake and '15' for a cake I was making the same day. The '15' was done in white gumpaste but later painted with the same black pearl dust as the inside of the '25' on the chocolate toppers, and the '25' was finished with some silver disco dust for a huge impact! 


I made a small little 6in round cake. Frosted it with cream cheese frosting, and piped Corneille lace all over. I then sprayed it with Wilton's Food Spray in Silver. It gave it a wonderful antiqued look. Then I placed the gum paste flowers and the feather topper on top. They looked amazing!!! I also draped some fondant pearls around the top to enhance the "roaring 20s" theme. 


I also frosted and topped all of my cupcakes.


They looked wonderful. I love the little toppers! And they're edible...even better! :) 


Once I arrived at the venue I was able to add the glittery '25' topper...and it looked FABULOUS!!!! Absolutely amazing and perfect for the party! 


And once it was stacked on the top of the cupcake stand it looked even better. I added some feather boas to the edges of the cupcake stand to make it look fancier and to help "carry" the feathers down the stand. 


It looked truly wonderful when finished! One of my favorite projects to date <3 <3 <3 


Tuesday, May 6, 2014

High Heel Mini-Cupcakes

I am sure you have seen pictures of this new 'trend' for cupcakes online, they are high heel cupcakes! Yay! What does a girl love more than cupcakes? Shoes!!! 
I was so excited when I had a friend ask for some I could barely contain myself. Oh the possibilities!!! Haha! I was given a color scheme of White, Silver, and Turquoise to work with. Adorable! I couldn't wait to get started! 
I began by looking at pictures online to get inspiration for decoration (none of the tutorials were extremely helpful with construction ideas however, since I am using mini cupcakes and will have to use different materials to make my cupcake heel). I decided that a combination of bows, flowers, and swirls would be best to decorate the cupcakes. 
The swirls would be piped on with buttercream, so no prep needed there. But the other decorations would need to be made out of fondant beforehand. 
I made my own fondant with some mini-marshmallows, water, and powdered sugar. If you've never made your own marshmallow fondant before - simply microwave around a cup marshmallows with a little over a tsp or so of water. When the marshmallows start to swell, remove them from the microwave and add powdered sugar until it forms a dough. Continue to kneed it together until it forms a fondant texture. Use shortening and powdered sugar to help get the correct consistency. 
I made up my white toppers, then covered them with some white pearl dust. I also made up some extra toppers with white fondant that were then sprayed with silver Wilton Food Color Spray. I then made up some turquoise fondant to make bows and flowers.
I added some edible adhesive to the centers of each flower and added white sprinkles or silver dragees to the adhesive. I was really excited with the end result! They look adorable! I cannot wait to put them on the cupcakes! 


Since the colors are white, silver, and turquoise, and they wanted red velvet flavor for the cupcakes I just made them turquoise velvet cupcakes instead. 


With white and blue cream cheese frosting


While I was waiting for my blue velvet cupcakes to cool, I made a test high heel :) I used a oblong butter cracker for the soul of the shoe, added a small amount of frosting to the back and attached a pretzel heel. It worked pretty well for regular chocolate frosting.


After I was sure about the best way to put them together, I started piping blue and white frosting onto each one and then added on the cooridinating toppers. They looked ADORABLE!!!!!! I had to put them in a box to transport them but it worked pretty well (this is box one of two).


When I finally got there only a few of them had broken heals, which were easily repaired. 
I set them up on my cupcake stand and they looked amazing!!! 


They were definitely a fun (but time consuming) project! So happy I got to do them though because they were worth every bit of it!!! :)

Thursday, April 10, 2014

Minecraft Creeper Cake w/Pig Cupcakes

My latest cake request came from my daughter's friend who is OBSESSED with Minecraft (who isn't? Lol!). She wanted a creeper cake with pink on it, so I decided to make some mini cupcakes with minecraft pigs on top. 
I had previously made a creeper cake (you can find a full tutorial here : http://sherilynncakes.blogspot.com/2013/10/minecraft-creeper-cake.html?m=1)

I made this cake in the same process that I had previously used, but I did add a pearl border to the top and bottom to jazz it up and make it look a little more feminine for her. 


I love it and think it turned out wonderfully. I enjoy doing cakes similar to those I have done before because it allows me to use the things I learned last time to make it better this time! :) 

Sunday, December 22, 2013

Snowflake Sugar Cookies

It's time for some holiday baking! Yay! I have been making a lot of goodies this week (chocolate covered marshmallows, cookies and cream bites, lots of fudge, etc) but these are the most visually stunning. 
I used some royal icing to make these gorgeous snowflake sugar cookies. I decided to use bright colors to make them pop and feel a little more modern/whimsical. 


I started out with a bunch of small snowflake sugar cookies - cooled completely. 


I used a thicker royal icing in a piping bag (with a size 5 round tip) to outline the snowflakes.


I 'flooded' the cookies with icing and put on lot of sprinkles before the icing dried. 


Then I swapped my frosting tip from a size 5 to a size 3 and started designing a little pinwheel snowflake look. I added bigger pearl sprinkles in the center to hide the messy spot where all the lines met. And that was it! 


I made a bunch of them, some of them were different shapes but those small ones were definitely my favorite ones out of this batch! 


They just look so wonderful! A perfect way to finish up my Christmas Goodie plates! :) 


Sunday, November 24, 2013

Pink Princess Cake with Shooting Stars

This weeks cake was inspired by one my friend had seen and described to me. 
It's a very glittery pink princess cake! Yay! :) 
I started by making all the fun little details that would make this cake special.
Using gum paste (with very little 'Deep Pink' coloring) I made numerous pink daisies. I let them dry in small plastic spoons to give them a nice curve in the middle, as well as a few petals moving different directions to give them.a more natural look.


When they were dry, I dusted them with pearl dust and added a small gumpaste flower center (which was also dusted with pearl dust) 


Using the same pink gum paste, I made a pink bow for the front of the cake. 
Placing rolled-up paper towels into the centers of the bow loops helps it stay in shape and not collapse on itself while it's drying. 
After it was dry, I dusted it with hot pink disco dust. Absolutely Fabulous! Haha! :)


Because this cake was a 2nd b-day cake, and would be eaten by many toddlers, I decided to use lollipop sticks instead of wire to hold up my stars. I used white gum paste and cut out stars, placed one on each side of the stick and 'glued' them together with water. Then once they dried I dusted them with white pearl dust to give them a nice shimmery star look. 
 

Besides the pearls, name banner and letters, I was ready for the cake assembling to start. 

I baked a vanilla bean cake with real Madagascar Vanilla Beans (yummmm!!!) 


Banana cream filling (with a pink frosting barrier)


After everything was stacked and frosted it was time to start putting everything together. 
I used fondant to make the banner, letters, and pearls (dusting them all with white pearl dust). I added pearls to the top, bottom, and the places where the piping touches in the middle. I stuck all the flowers down with a little extra buttercream, and dusted the whole cake with the disco dust so it shimmered. 
I also added a silver and pink tiara, as well as a little wand on the front next to the bow. 


And to finish it off....the stars!!! I added 5 stars, all a little off center from each other.


I absolutely love how this cake came out!!! Super cute and girly! <3 always thankful for all these different, fun cake projects!