Thursday, May 16, 2013

White and Gold Gum Paste Roses

My class project this week required that I make all my decorations ahead of time because we wouldn't really have enough time in class to make them. 
I decided to make a cake that had gum paste roses on top. And never having made them before, I was excited for the challenge. 
I saw a tutorial online for making a gum paste rose with only a circle cutter, so I was prett confident that I could handle it. 

I started by cutting out my gum paste circles. I smoothed the edges with a ball tool and left them in a flower former to help them begin to dry. 


I found that working with them quickly, and not making too many up in advance, was best. Letting them dry too long would make them crack a little when I tried to mold them. 


I bought some simple rose cores from Wilton to make this process a little faster/easer. It REALLY helped! I highly suggest the splurge! 
I started with the small petals, applying them around the core until it looked like a small rose bud center.


I made sure to put the leaves in groups of  3 & 5 as I went around to help it look more like a rose. 


After I had a row of 3 and 5 small petals, I moved on to the medium sized petal. Placing 3, then 5 petals around the rose bud I had already created. Making sure to turn the petals out and shaping them as I went.


Then the largest leaves got put on (also in groups of 3 & 5). And I ended up with something that looked pretty close to a real rose. 


And I kept going until I had 6 roses finished. 


Then I dusted all over the petals with pearl dust and outlined the petals with a gold luster dust to give them dimension and make them look 'antiqued'. 


Excited to see how they look ontop of the cake tomorrow!!! :) 

Wednesday, May 15, 2013

Purple Topsy Turvy Rose Cake


Time to make a fun crooked or topsy turvy cake! It's my last week in class so I wanted to make it really fun and challenging. 
I had to make all of my decorations the week before so they would have enough time to dry when I put them on the cake.

I made a bunch of small gum paste pearls and threw them in a plastic bag with a tiny pinch of gold luster dust. After rolling them around for a second they were all covered and ready to go. 


I also made some larger gum paste pearls, but covered those with just a white pearl color. They looked wonderfully shiny when they got done. 


I knew I was going to use the pearls as a border on the largest bottom tier, so it was time to figure out what I wanted my second tier to look like. To help keep the look clean and elegant I ended up picking a bow and ribbon to finish off the top tier.
I had to make a bow (simply rolling out my gum paste, cutting long ribbons, and folding them over a paper towel round)


And of course the ribbon ends that fall nicely over the edges. 


I decided to make a pretty brooch for the inside of the bow instead of just finishing it off with a gum paste ribbon. 
I used a Wilton jewel mold to make this pretty little brooch. It worked really well! 


Once it dried a little bit, I brushed it with some pearl luster dust. Because a brooch can't be matte! It must be shiny! Lol! :)


Then I took some gold luster dust(+vodka) and painted a few of the details, helping them pop. I love how it turned out!!! 


I also had some gum paste roses I had made a few days earlier (see previous post for tutorial/more pictures).


After dusting the roses with a little pearl and gold luster dust, I packed everything up so it didn't get broken before my class this week. 


I baked a variety of flavors this week, because a crooked cake shouldn't take itself too seriously, it's a fun cake! :) 
So the top (6in) tier is chocolate/vanilla/chocolate. And the bottom tier is key lime/vanilla/orange. With a standard buttercream as filling for both.
I started with a 6in and 9in cake, placed on a 5in and 8in cardboard. I turned them upside down and carved a slight slant into the sides of the cake so the base of each tier was fit onto the smaller cardboard. 


I used a 6in cardboard to carve a hole in the top of my bottom cake, as well as carving a slight slant into the top of both tiers.


I covered both tiers with a dark purple fondant and stacked them so that the slants on the tops went different directions. 
I also added the premade pearls to the bottom tier (alternating colors/sizes). 


To finish the cake off, I placed the gum paste bow between the two tiers with a little buttercream icing, and made a quick gum paste ribbon to drape around the entire thing. 
I also added the gum paste roses to the top, and decorated it with a few more leaves to help complete the look. 


It turned out so fabulously!!! 


Absolutely the best cake I have made so far! I love it! Love it! Love it!
Fun, funky, elegant, PERFECTION!!!! :) 


Thursday, May 9, 2013

Lace Airbrushed Cake

I apologize for my lack of pictures this week. I try so hard to grab as many pictures as I can but this week I had some dental work done and was just not really motivated (or 'alert' enough to remember) to take pictures before I was finished. I am sorry for that! 
However we did learn how to work with the airbrush this week in class. It was very interesting! I am not an artist, so I was using it more as a tool for laying a base/accent color down on my cake. Not necessarily to 'paint' an image on the cake. I am not that talented sadly. 

But I did lay some lace over my simple 9x13 frosted with white buttercream. I decided to try to make a teal colored cake this week. So I mixed blue, white, and a little bit of green, to give me that nice bright teal color. I sprayed all over the cake before removing the lace, giving a more continuous look to the pattern. 

Then I placed a 'Happy Birthday' stencil over the top of the cake and sprayed black over it. It worked out pretty well! Way better (and FASTER!) than using icing for sure!

We also worked on making gum paste flowers today. They didn't have enough time to dry completely. However they were dry enough to place on the cake, just not dry enough to cover with petal or luster dust. So they stayed white. But that's fine. It looks great with this cake. The color is so bright that the simpler flowers are needed. 
I did make a few small leaves covered with petal dust (as you can see it didn't cover completely) to help complete my flower arrangement. 

The finishing touch was the simple pearl/circle border around the bottom to cover up any mistakes. 

It's definitely not perfect but I am pretty happy with it. I am giving it to my friend this week. It's not her birthday exactly...but soon. So why not celebrate early! :) 


Red & Gold Monogram Mini-Cupcakes

This was a fun little project of mine that was not related to my classes this week. This is a picture filled post :)

A friend of mine (and my wonderful hair stylist!) asked me to make 150 mini cupcakes for a party they were having at the salon. They wanted a "R" on the cupcakes for the name of the salon, and their colors were red and gold. So we decided on red velvet mini cupcakes and she told me to be creative the topper.

One thing I did know that I wanted was a nice gold (luster dust covered) 'R' made out of white chocolate.
So I printed out a paper with a bunch of 'R's on it, each about an inch long. I covered it with wax paper and started using a small parchment bag and melted white chocolate to pipe a bunch of cursive 'R''s.


It took me a while to get the hang of it, because the chocolate is much harder to pipe.


Then I waited for them to dry and dusted them with the 'Old Gold' luster dust.


It worked pretty well as long as you didn't really handle them too much.


Next I had to figure out what I wanted the rest of the topper to look like.

I started with a homemade marshmallow fondant (just marshmallows, a few teaspoons of water in the microwave until it gets warm. Then a ton of powdered sugar until its workable) and rolled it out very thin. Using the bottom of one of my frosting tips, I cut out a few circles of fondant to work with.


I painted the first few with a combo of vodka/luster dust to create gold discs. Not really my favorite look for this project.


Then using some fondant that I dyed red to make a slightly smaller fondant disc to put on top. Then used the vodka/luster dust combo to paint the letter 'R' and other accents.

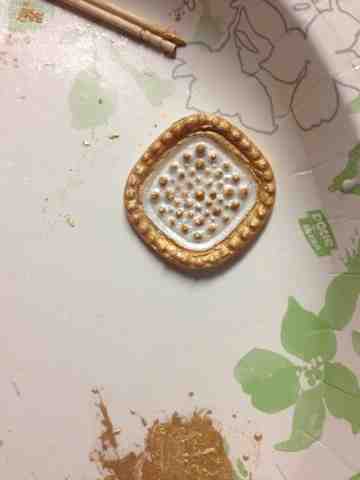
I also played around with a few white ones. And painting gold luster dust on them.


And a red disc with a gold 'R' and dots


Then a combo of luster dust and the white chocolate 'R' which really looked a lot better.


So I tried it out with a red fondant disc as the back ground and liked that so much more than the white ones. 


After checking it out with the cupcake papers, I decided to go with this style.


I also decided to spruce it up a little bit and add some Ruby Red disco dust onto the red fondant before adding the gold 'R' on top. It really made the topper look finished.


So I started making 150+ toppers........
Rolling out fondant....


Cutting out so many fondant circles and allowing them to dry for a while.


Covering them with a mixture of corn syrup and water, before dusting them with disco dust so that it adhered and didn't fall off.


The disco dust is much harder to work with than the luster dust but really worth it! The visual impact that you get from the disco dust is just amazing! 


Then covered them all in Disco Dust...


After letting those dry for a while, I added corn syrup to the back of the white chocolate 'R''s and added them on top of the red fondant discs.


 It was a rather tedious task since the white chocolate 'R''s were very fragile and tended to break.


I did make a whole bunch of extras for this purpose but next time I will definitely make these out of royal icon or something else a little harder than the chocolate. 


After finishing all my toppers, it was time to start the cupcakes.


I gathered my ingredients and began mixing.


I used a extra small ice cream scoop to make sure that all of my cupcakes were the same size and all cooked evenly.


After I had them scooped, I baked them for 18 minutes...


Let them cool for 10....


And placed them in the sheet boxes (with card board on the bottom to help support the cupcakes), and wrapped them with plastic wrap to make sure that they didn't get dry overnight. 


While I was baking the cupcakes I made the frosting. It was equal parts butter an cream cheese, with as much powdered sugar as needed to get the texture you want.


The next morning, I unwrapped the cupcakes and got them ready to frost. 


Using the largest round tip I could find. I added small dollops of frosting on top.


Then carefully added each topper, trying to not get all of the extra disco dust on top of the pretty white frosting.


This is all 150 after they were finished. Really beautiful! I loved them!


And this is a picture my friend sent me afterward to show me how the cupcakes looked on the cupcake stand at the party. Everyone loved them! Yay! Super successful party! :)