Friday, June 21, 2013

Shamrock Mini-Cupcakes

This week I had the wonderful opportunity to make a huge batch of mini cupcakes for a fantastic charity, the St. Baldrick's Foundation (which raises money to fund research for childhood cancer. Look them up and donate! It's an amazing cause!). They were having a head shaving party/ spaghetti feed and wanted a fun dessert. 
The charity is Irish/St.Pattys day themed, so we wanted to make some fun/glittery little toppers. 
Using pre-colored fondant I rolled it out about 1/8in thick and using a small primrose cutter, I punched out a pretty green primrose. To turn it into a shamrock I took a very sharp knife and simply cut one of the petals into a rectangle for the stem. It actually worked A LOT better than I expected. 


Then I started making TONS of them...


Until I reached 450 (400 for orders, 50 just incase)...


I let them sit for a day or two to help them dry out (much easier to pick up and place on the cupcake that way). When they were ready, I mixed HOT water and corn syrup in a spray bottle and lightly misted the shamrocks with this mixture until they were slightly tacky, but not too wet. Then I used a dry paint brush, dipped in emerald green disco dust, and sprinkled it over the top - making sure to cover each one really well.


I let that dry and went over it one more time (using even less water/corn syrup this time), to ensure that each one was well covered


Then onto the next project - the cupcakes :) 
Yummy buttery vanilla mini cupcakes!!! I always add an extra tsp. or two of a Butter/Vanilla extract because I like my cucpcakes to be a little richer. 
And using a scoop is THE BEST advice I could give you! Get one for your large cupcake and minis. It will absolutely change your (baking) life!!! Haha! :) I know that sounds silly but I used to loathe cupcakes until I got my little scoops. No more batter on my hands, no more mess, or unevenly baked cupcakes! Seriously the best! 


See, it makes them all so even and nice! 


And it helps me finish in 1/2 the time! 


I baked those off (always at 325deg. no matter what the recipe says, to help them raise more evenly), and placed them on cooling racks until they just cooled down.


And then I baked 412 of them :) 


Placed them in boxes (with double strength cardboard on the bottom) and wrapped them with Saran Wrap so they didn't dry out overnight. 


The next morning I made up a fresh batch of fluffy white buttercream and used a (very) large round tip to frost them. 


And then placed the glittery shamrock toppers on top of the cupcakes before the buttercream crusted. 


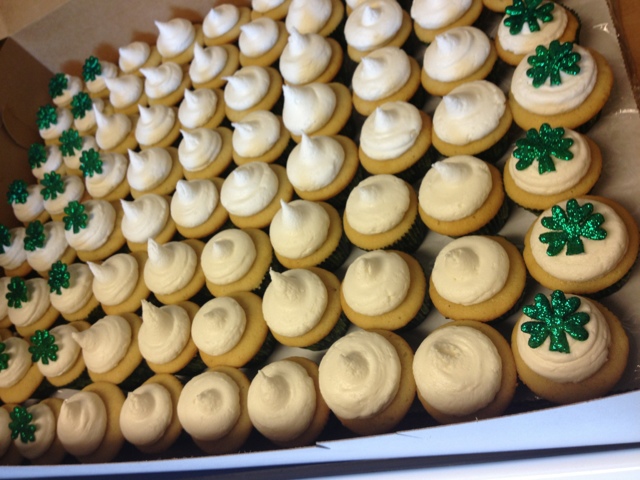
They looked wonderful when they all got done!


And 5 boxes, 400 cupcakes, and they are done! :) Yay! 


Getting ready to drop them off at the event and I couldn't help but grab a little photo op with Abe Lincoln (all dressed up for the fundraiser). He approves of the cupcakes :) lol! 


And all set up! 6 tiers and even had to cover some of the table. 
They looked really spectacular on the table! The whole thing was as tall as I was and a big hit!!! :) I am so in love with this cupcake tower! The visual impact was wonderful! Better than I ever expected!!!


Wednesday, June 12, 2013

Anchor Cupcake Tower with Small Navy Cake

This week I had a request for some cupcakes, with a small cake to top the cupcake tower. It was for a birthday/navy/going-away party.
I immediately thought of anchors for the cupcake toppers. So I went and picked up a chocolate mold that had anchors the size I needed. I also picked up black, white, and yellow candy melts to make the anchors. As well as some pearl color mist to give them a silver shine/shimmer. 
I painted the yellow candy melts into the chocolate mold (where the rope was showing around the anchor), and then poured melted grey candy melts (made using black and white) over the top. Tap it a few times on the counter to work out the air bubbles, and place it in the freezer to set for a second or two. Then turned out onto wax paper and sprayed with the pearl color mist.
I LOVED how these turned out!!! They looked exactly like real anchors, with that pearl shimmer making them look like metal. They turned out better than I could have wished for! 


After having the toppers finished and set aside, I started planning out the small cake that would be the topper on my cupcake stand. I had a styrofoam dummy cake (that is used to practice decorating, or as a filler in larger cakes to cut costs) that was exactly the right size (a 6in round) so I was able to get on my computer, play with some graphics, print them and size them to fit on the cake perfectly. 


Then I was able to send that image off to my local decorating store, where they printed off the image on an edible sugar sheet. It was a really amazing process. Makes me want to have my own image printer. 


I was able to cut the images out and simply place them onto the icing. 


They really turned out amazingly! I love the crisp look of it. And, as someone who is kind of artistically challenged, it was the EASIEST way to add major impact to your cakes! 


Sadly the day I delivered this cake it was very hot and it was made out of cream cheese frosting....so, yea...it melted a little. Just slightly lopsided, but still very beautiful all put together. 
Overall I am very happy with how this cupcake tower turned out. 
Everyone there really loved it!


And as a little gift from Mom to her new sailor, a 'mom' tattoo :)

Sunday, June 9, 2013

Black & White Damask Cupcakes

My friend was having a baby shower for her (upcoming) baby girl. She asked if I could make some cupcakes for it and, of course, I jumped at the opportunity. 
The colors/theme for her party was black, white, hot pink, and a damask pattern. I was lucky enough to find this amazing damask cupcake stand and hot pink foil cupcake papers. PERFECT for the theme of the party!!! 


I also made some bow toppers out of candy melts (in black and white) and sprayed them with a pearl color mist. They turned out well. 


I made 12 vanilla cupcakes...


And 12 chocolate...


Then placed the black bow on the vanilla cupcakes...


And the white bows on the chocolate cupcakes...


Then, when I got to the party, I arranged them on the damask cupcake stand. Trying my hardest not to smear black/white frosting on the wrong cupcake :) 
But I am very happy with the final product! The whole stand looks great!