Showing posts with label disco dust. Show all posts

Friday, June 21, 2013

Shamrock Mini-Cupcakes

This week I had the wonderful opportunity to make a huge batch of mini cupcakes for a fantastic charity, the St. Baldrick's Foundation (which raises money to fund research for childhood cancer. Look them up and donate! It's an amazing cause!). They were having a head shaving party/ spaghetti feed and wanted a fun dessert. 
The charity is Irish/St.Pattys day themed, so we wanted to make some fun/glittery little toppers. 
Using pre-colored fondant I rolled it out about 1/8in thick and using a small primrose cutter, I punched out a pretty green primrose. To turn it into a shamrock I took a very sharp knife and simply cut one of the petals into a rectangle for the stem. It actually worked A LOT better than I expected. 


Then I started making TONS of them...


Until I reached 450 (400 for orders, 50 just incase)...


I let them sit for a day or two to help them dry out (much easier to pick up and place on the cupcake that way). When they were ready, I mixed HOT water and corn syrup in a spray bottle and lightly misted the shamrocks with this mixture until they were slightly tacky, but not too wet. Then I used a dry paint brush, dipped in emerald green disco dust, and sprinkled it over the top - making sure to cover each one really well.


I let that dry and went over it one more time (using even less water/corn syrup this time), to ensure that each one was well covered


Then onto the next project - the cupcakes :) 
Yummy buttery vanilla mini cupcakes!!! I always add an extra tsp. or two of a Butter/Vanilla extract because I like my cucpcakes to be a little richer. 
And using a scoop is THE BEST advice I could give you! Get one for your large cupcake and minis. It will absolutely change your (baking) life!!! Haha! :) I know that sounds silly but I used to loathe cupcakes until I got my little scoops. No more batter on my hands, no more mess, or unevenly baked cupcakes! Seriously the best! 


See, it makes them all so even and nice! 


And it helps me finish in 1/2 the time! 


I baked those off (always at 325deg. no matter what the recipe says, to help them raise more evenly), and placed them on cooling racks until they just cooled down.


And then I baked 412 of them :) 


Placed them in boxes (with double strength cardboard on the bottom) and wrapped them with Saran Wrap so they didn't dry out overnight. 


The next morning I made up a fresh batch of fluffy white buttercream and used a (very) large round tip to frost them. 


And then placed the glittery shamrock toppers on top of the cupcakes before the buttercream crusted. 
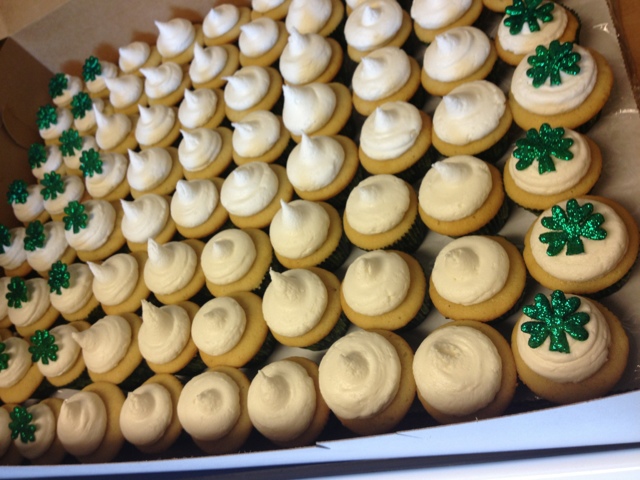

They looked wonderful when they all got done!


And 5 boxes, 400 cupcakes, and they are done! :) Yay! 


Getting ready to drop them off at the event and I couldn't help but grab a little photo op with Abe Lincoln (all dressed up for the fundraiser). He approves of the cupcakes :) lol! 


And all set up! 6 tiers and even had to cover some of the table. 
They looked really spectacular on the table! The whole thing was as tall as I was and a big hit!!! :) I am so in love with this cupcake tower! The visual impact was wonderful! Better than I ever expected!!!


Thursday, May 9, 2013

Red & Gold Monogram Mini-Cupcakes

This was a fun little project of mine that was not related to my classes this week. This is a picture filled post :)

A friend of mine (and my wonderful hair stylist!) asked me to make 150 mini cupcakes for a party they were having at the salon. They wanted a "R" on the cupcakes for the name of the salon, and their colors were red and gold. So we decided on red velvet mini cupcakes and she told me to be creative the topper.

One thing I did know that I wanted was a nice gold (luster dust covered) 'R' made out of white chocolate.
So I printed out a paper with a bunch of 'R's on it, each about an inch long. I covered it with wax paper and started using a small parchment bag and melted white chocolate to pipe a bunch of cursive 'R''s.


It took me a while to get the hang of it, because the chocolate is much harder to pipe.


Then I waited for them to dry and dusted them with the 'Old Gold' luster dust.


It worked pretty well as long as you didn't really handle them too much.


Next I had to figure out what I wanted the rest of the topper to look like.

I started with a homemade marshmallow fondant (just marshmallows, a few teaspoons of water in the microwave until it gets warm. Then a ton of powdered sugar until its workable) and rolled it out very thin. Using the bottom of one of my frosting tips, I cut out a few circles of fondant to work with.


I painted the first few with a combo of vodka/luster dust to create gold discs. Not really my favorite look for this project.


Then using some fondant that I dyed red to make a slightly smaller fondant disc to put on top. Then used the vodka/luster dust combo to paint the letter 'R' and other accents.

I also played around with a few white ones. And painting gold luster dust on them.


And a red disc with a gold 'R' and dots


Then a combo of luster dust and the white chocolate 'R' which really looked a lot better.


So I tried it out with a red fondant disc as the back ground and liked that so much more than the white ones. 


After checking it out with the cupcake papers, I decided to go with this style.


I also decided to spruce it up a little bit and add some Ruby Red disco dust onto the red fondant before adding the gold 'R' on top. It really made the topper look finished.


So I started making 150+ toppers........
Rolling out fondant....


Cutting out so many fondant circles and allowing them to dry for a while.


Covering them with a mixture of corn syrup and water, before dusting them with disco dust so that it adhered and didn't fall off.


The disco dust is much harder to work with than the luster dust but really worth it! The visual impact that you get from the disco dust is just amazing! 


Then covered them all in Disco Dust...


After letting those dry for a while, I added corn syrup to the back of the white chocolate 'R''s and added them on top of the red fondant discs.


 It was a rather tedious task since the white chocolate 'R''s were very fragile and tended to break.


I did make a whole bunch of extras for this purpose but next time I will definitely make these out of royal icon or something else a little harder than the chocolate. 


After finishing all my toppers, it was time to start the cupcakes.


I gathered my ingredients and began mixing.


I used a extra small ice cream scoop to make sure that all of my cupcakes were the same size and all cooked evenly.


After I had them scooped, I baked them for 18 minutes...


Let them cool for 10....


And placed them in the sheet boxes (with card board on the bottom to help support the cupcakes), and wrapped them with plastic wrap to make sure that they didn't get dry overnight. 


While I was baking the cupcakes I made the frosting. It was equal parts butter an cream cheese, with as much powdered sugar as needed to get the texture you want.


The next morning, I unwrapped the cupcakes and got them ready to frost. 


Using the largest round tip I could find. I added small dollops of frosting on top.


Then carefully added each topper, trying to not get all of the extra disco dust on top of the pretty white frosting.


This is all 150 after they were finished. Really beautiful! I loved them!


And this is a picture my friend sent me afterward to show me how the cupcakes looked on the cupcake stand at the party. Everyone loved them! Yay! Super successful party! :)